One of the problems I first encountered when getting into shoemaking was figuring out what tools I needed, and where to get them. This will be a breakdown of what tools I’ve accumulated over the past several years, what I use them for, and I’ll throw in some links at the bottom from suppliers/manufacturers that might prove useful.
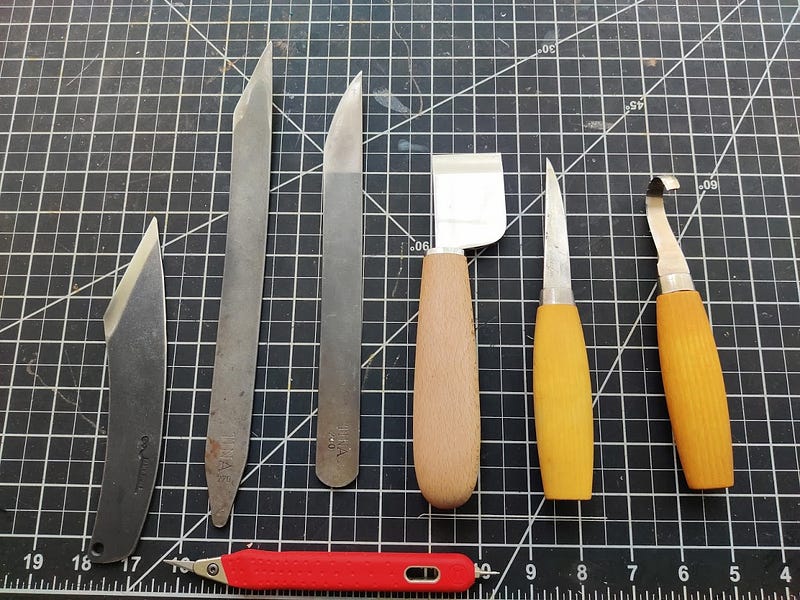
You can never have too many knives! There is no one perfect knife in shoemaking, some do specific jobs better than others. Far left is a big bruiser I got from a small custom knife shop in Florence run by Fabio Figus (he’s on Instagram). Any straight shoemaker’s knife will fill its role though, I use it mostly for trimming insoles/outsoles, as well as odds and ends where a straight edge is preferable to a curved one. Its also useful because you can cut with a push or pull motion.
Second (going left to right) knife is the Tina 270. Another staple, useful for trimming and skiving. For me though, no other knife beats it for cutting open the channel for hiding the sole stitch.
Next is the Tina 230. Probably my second favorite all around knife. This is my go-to for skiving though, the combination of the curve of the knife, and the curve of the cutting edge makes it perfect to get nice, clean skives. If I had to pick just one knife to keep, it would be this one simply because the first knife I mentioned isn’t very useful for skiving. Both the 230 and 270 have a upwards curve to the blade, the main difference between the two is the shape of the cutting edge.
Next is a Japanese style knife from Starko Tools. Incredibly sharp, and very useful for trimming insoles, making sure its flush with the last. Its the best knife for skiving heel counters and toe puffs, since they are usually pretty dense and thick veg tan, pushing the knife through is much easier than pulling with one of the Tina knives.
Next is a sloyd knife. I picked it up for woodworking, but its super useful when carving the sole for a bevelled waist. You can control the point much easier than any of the other knives, plus you can both push/pull the cut.
Next, a hook knife. This is another woodworking knife that found a use for making a fiddleback waist. You have to thin down the sole from the flesh side, before you attach it to the shoe. The hook knife does the job wonderfully because it can get in anywhere from the top, whereas a normal knife awkwardly cuts it from the side.
Finally, at the bottom, a “Mozart” knife. I use this for cutting out patterns, clicking, and trimming lining allowances. Disposable blades make sure you don’t have to be an expert sharpener.
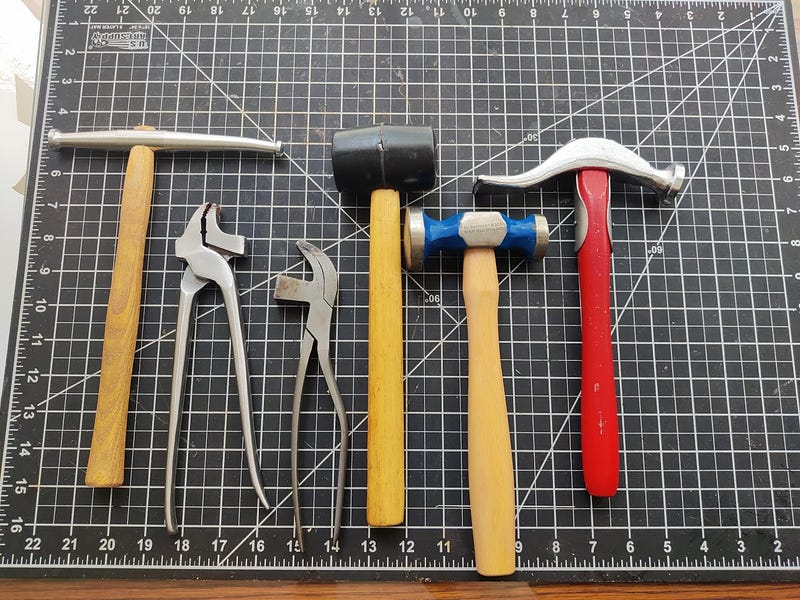
Far left is a tack hammer. For whatever reason, its much easier to nail in tacks with it. Also useful to hammer in a few nails into the top of the heel, from inside the shoe, with that weird long side of the hammer.
Next are my two pairs of lasting pliers. Left one is a pair of lasting pliers from Tina. The way the hammer portion is shaped is the best, from the few different types of lasting pliers I’ve tried. You can get much better leverage with this shape. I mostly use this for the “rough” lasting, and finish everything off with the narrow nosed lasting pliers to the right. These I got at a shoemaking shop in Japan, so not sure what brand, but any narrow nosed lasting pliers will do. If you’ve only used normal lasting pliers, having a pair of narrow nosed pliers is a complete game changer. I would like to get a pair of bulldog pliers next, but so far I’ve been able to get everything done without them so maybe that will wait.
Next is a rubber mallet, for hole punches, brogueing, etc.
Next is a hammer I got from George Barnsley in the UK, its used primarily for compressing and flattening leather soles after you finish stitching. You can get away with using a normal hammer for this, but the big head makes it easier.
Finally, a French style shoemaking hammer. A must have for any shoemaker. I use it all over, compressing stitches, evening out seams if I didn’t skive well enough, compressing the heel counter and toe puffs, hammering the leather while pulling on it with some lasting pliers works wonders on getting it where you need to go. Basically, you can find a use for a hammer anywhere, my teacher, Masako, said that the hammer is her most useful tool while making shoes.
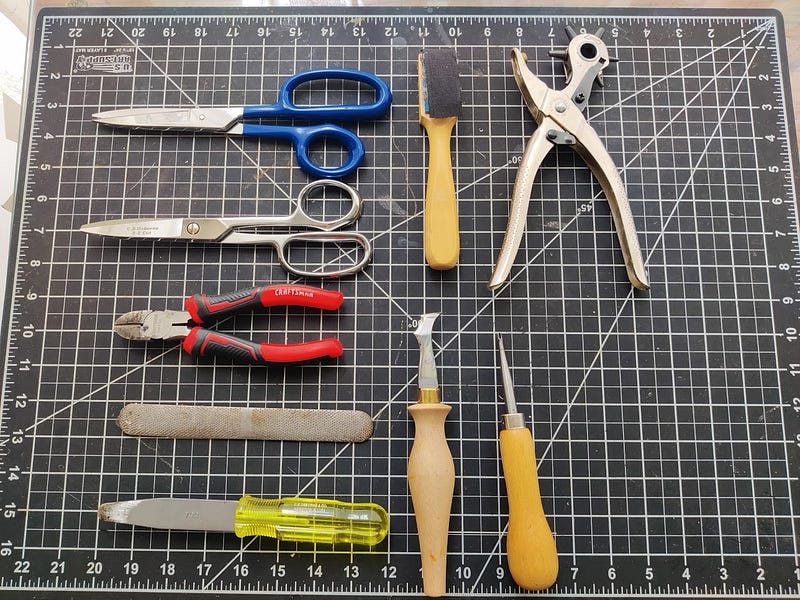
Top left is the only pair of scissors you’ll ever need for leatherworking. Sold by Tandy, if you Google “tandy crafttool scissors” they’re one of the first things that pop up. Not only are they really sharp, they have a small serration on one of the edges, which helps have control of the cut. They’re so great, I’m not even going to talk about the second pair of scissors in this pic.
Next down in the first column is a simple pair of nail snips (is that what its called?), I use them for pulling nails while lasting.
Next is a rasp I got from a shoemaking shop in Japan. Very useful all around tool anywhere where you might want to reduce the amount of leather. Shaping heels, filing down bumps, shaping the cork filler, etc.
Bottom of first column is a heel pry. Useful if you glued something down, and decide you don’t want it glued down anymore!
Second column, scratcher tool. I use it to roughen up leather before gluing it down, especially useful for attaching soles.
Next down is a channel opener tool I got from Starko Tools. You can definitely live without it, but its useful when making a holdfast on an insole. When you make a cut, you can run this tool along it to open up the leather.
Third column, top, is a hole punch tool from C.S. Osborne mostly I use this for popping holes for eyelets.
Final, bottom right, is a channel groover from C.S. Osborne. The only use I have for this is for making a channel, where my outsole stitch sits.

These are all of my irons, mostly used for finishing the soles and decorative work. I got most of the tools in this picture from Starko.
The five on the top left are all edge irons. The first one is a waist iron (size 9), useful for making a beveled waist, the next are edge irons size 9–11. The edge irons are heated, then applied to the edge of the sole to make an even width. Since you wet the leather before applying the iron, the heat also hardens it.
The next two (in the top middle), one is a heel iron, same uses as the waist irons. It also evens out the top of the welt around the heel, which can get a bit wavy sometimes as you get it wet. The second one is a glazing iron, you can heat it and go over waxed edges to get the wax into the leather and burnish it.
First three on the bottom left are fudging irons, at different SPIs (8, 10, 11). This is for marking out stitches on a welt.
Next is a slide box wheel, it serves two purposes, one for evening out the top of the heel like the heel iron, the other is making some decorative markings along where the welt joins the sole.
Next is another fudging tool, you can use this to go over areas the fudging wheel didn’t hit very well, or just make the lines crisper with it.
Next is a decorative wheel, for fancy sole work, I barely ever use it.
Next is my lamp! You light it, then set any of the irons up on the platform to heat up before use.
Finally, a glazing stick! I forget exactly what its called, but I got it from Starko Tools. Its used for evening out leather soles, and burnishing them.
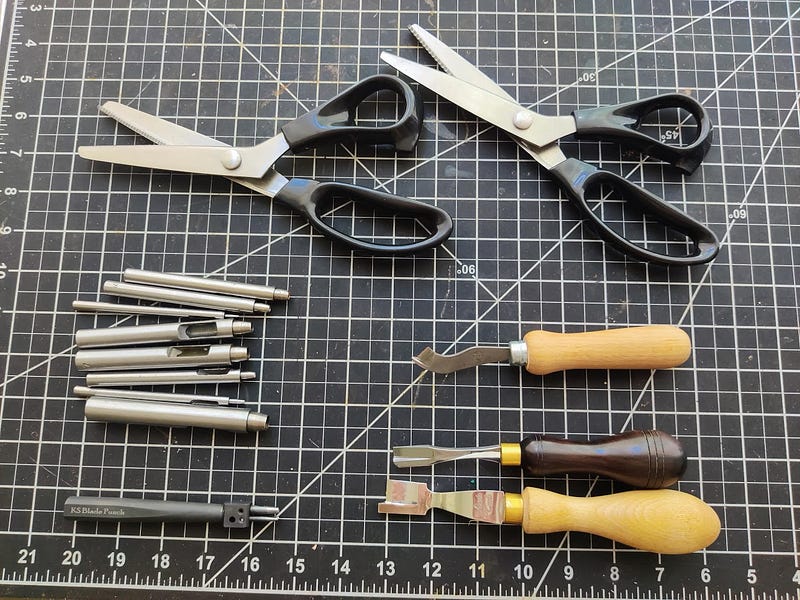
Top two are different size pinking shears. I can’t remember where exactly I bought them, one of those Chinese Amazon type stores. The quality isn’t great, but they were cheap and get the job done. If I ever find a good quality pair I will definitely replace.
Left bundle are my hole punches, used for eyelets, decoration, etc.
Followed up by a brogueing punch at the bottom, from K. S. Blade and Punch. Its expensive, but very high quality. For a brogue punch, its important to find one with one big middle hole and the two small holes on the side (instead of two on each side), that way you can make curves much easier.
Second column, top to bottom, first is a Tina rand/welt knife. You can get away with using a knife for most of what this does, but sometimes its useful to have a specific tool. I use this for trimming the edges of a welt, and if I don’t use a rand at the heel and just have the sole back there, this knife is useful for trimming the top down without cutting into the upper.
Next two are feathering knives, for creating a holdfast. You can make a holdfast with just a normal shoemaker’s knife, but these things make the job way easier. I got the top one from a shoemaking tool webshop on a Chinese websites like Amazon, but the webshop is unfortunately closed now. I use it for the inside cut of the holdfast, and the bigger knife (got from Starko Tools) for the outside cut. You don’t need two knives to do it, but the system works for me better than just using one of them for both. I don’t like using the Starko knife for the inside cut because if you’re not careful, it can go too deep.
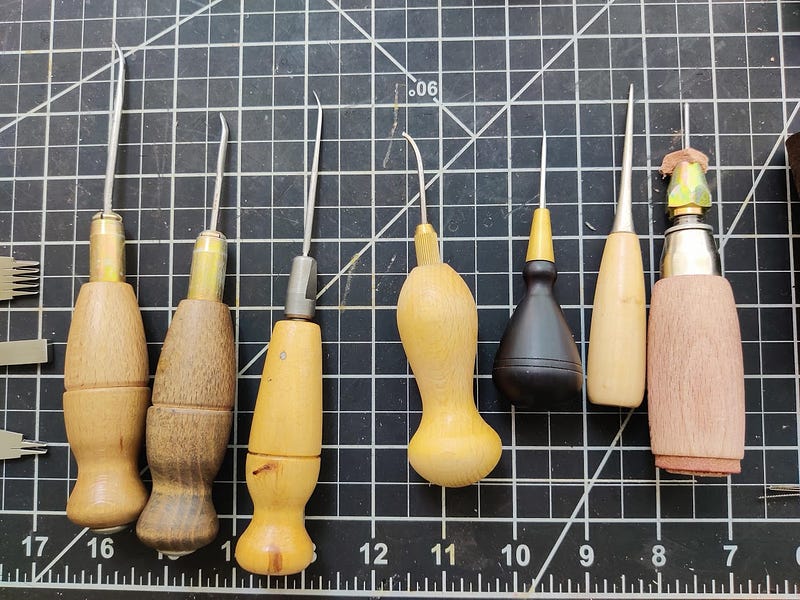
My awl collection. Far left is my inseaming awl, followed by another inseaming awl that is a bit too short and straight for my liking. Third is a thin inseaming awl, I’ve used it for making the apron stitch on a moc toe shoe before. Note on awls, I’ve yet to find one that works off the shelf. I always have to shape them a bit on my own, and sharpen the sides (not just the tip). With a good edge on the sides, you can wiggle the awl in from side to side, cutting the leather as it goes in, instead of just trying to jam it in point first.
Next is a small square awl, used for outsole stitching. I got it at Starko Tools, which is the only supplier I have been able to find that has them this small, useful to have a few pairs on hand since the are liable to break. If you want to do anything 8+ SPI, you have to have an awl this small.
Next are two scratch awls, useful for poking holes in things!
Finally, a pegging awl, for when you want to do a wood pegged waist.
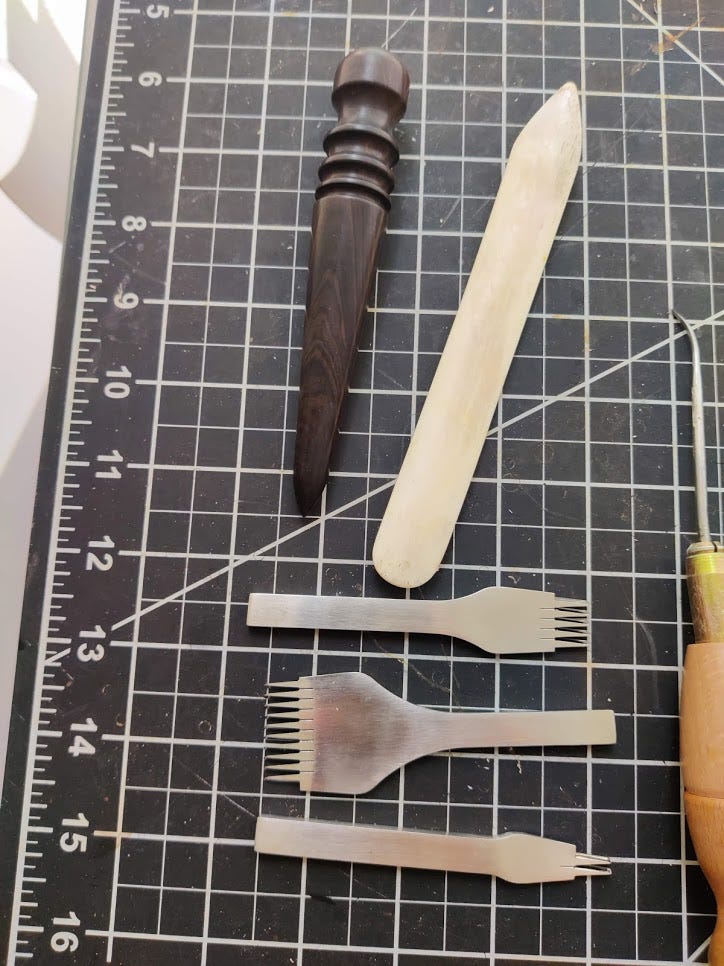
Top left is a burnishing rod, I use it while finishing the edges. Next is a bone folder, all around useful tool when you want to push some leather down, or pull it up a bit off the nails while lasting, so you can get some glue in.
Bottom three are punches for hand stitching, I mostly use this for making a stay stitch on derbies.

Pattern making tools. Top is the clicking knife I mentioned earlier, next is a compass, ruler, pencil, and shoemakers tape. The tape is essential when measuring feet for sizing, the reverse side has shoe size measurements based on length.
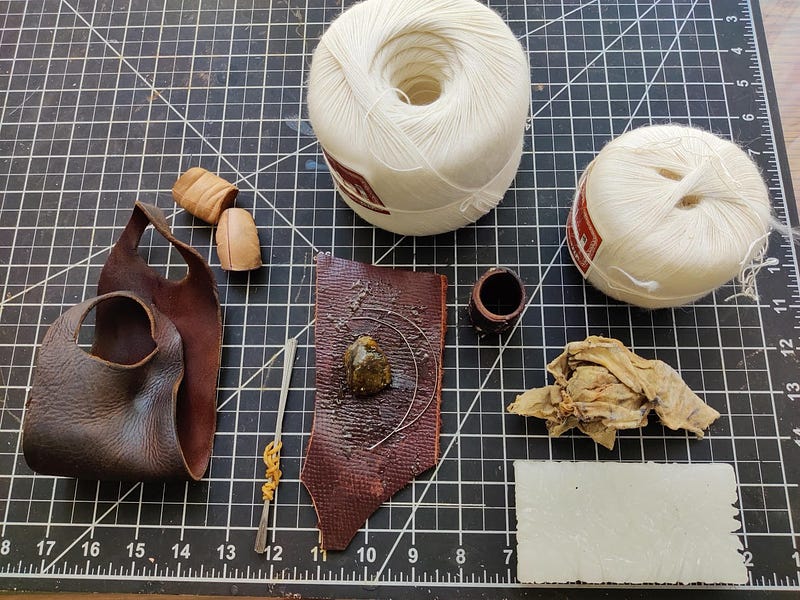
This is a bit of a mix of tools and supplies, but it works.
Left side are my hand and finger protectors for when I’m stitching. Next is a bundle of metal bristles (Shoe Technik sells the larger ones I use for welting, Starko sells the smaller ones for sole stitching), followed by some shoemaker’s wax and some used bristles. Shoemaker’s wax is coated on the Ramie thread (top right) to waterproof it, and to make it stick together (I use 5 ply for inseaming). Next is another protector I use on my thumb, while I apply the shoemaker’s wax to the thread. Then a cloth to vigorously rub the thread, which melts the wax and makes it seep into the thread. Finally, some paraffin wax on top to help the thread slide through the holdfast.
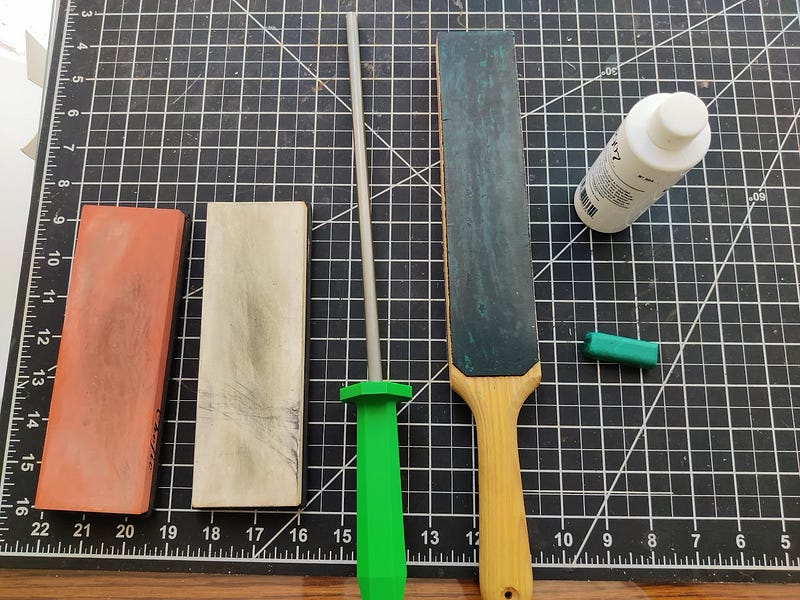
If you want to be a shoemaker, learn how to sharpen knives! This is my setup, 3000 and 8000 grit water stones, a shaping rod (useful to even out the edge without having to sharpen it), and a strop with strop dressing (Fromm 1907) and a sharpening compound. The strop is the real trick to getting a sharp knife! You can make your own with a strip of leather on wood, get some of the sharpening compound on it, then finish off with the strop dressing.
Here are some useful links to online shops that sell tools:
Shoe Technik — Shop based in Italy, a lot of great tools for a reasonable price, but shipping is expensive.
G. Barnsley — One of the biggest shoemaking tool manufacturers out there, based in the UK
C. S. Osborne — Tool manufacturer in the US.
Starko Tools — One man shop based in Ukraine. Tons of great quality tools for very reasonable prices. As you may have noticed, I’ve bought a lot of my tools from this guy.
Sorrel Notions and Findings — Lisa Sorrel’s webshop. You pay a pretty high markup buying from her, but she has a huge selection
District Leather Supply — Decent selection of hand tools and leather
Rocky Mountain Leather — Leather and some tools
Carreducker — Overpriced in my opinion, but you can find some stuff here that might not be available elsewhere
Zegzug Store — Marcell Mrsan’s shop, occasionally some great stuff here, but some items are overpriced imo.
