
After I went to the Stefano Bemer shoe making course, I ended up meeting several boot makers in the Tulsa, Oklahoma area. I have to say, the level of creativity and artistry was completely unexpected. I was used to seeing cheap mass produced cowboy boots worn as work boots, so I had this impression of boring and utilitarian. The world of bespoke cowboy boots is all about color and beautiful designs, I have tried to incorporate that a bit in my shoe making as well.
This is not a comprehensive guide, since I am still fairly new to boot making myself, but I think some of the tips and techniques here will be useful in conjunction with other material.
Cowboy boots typically follow the same pattern for the vamps and counters, just a small/medium/large with the excess trimmed off. The pattern for the tops are created for the individual foot. Taking the short heel measurement (tape wrapped around the top of your instep and the base of your heel).
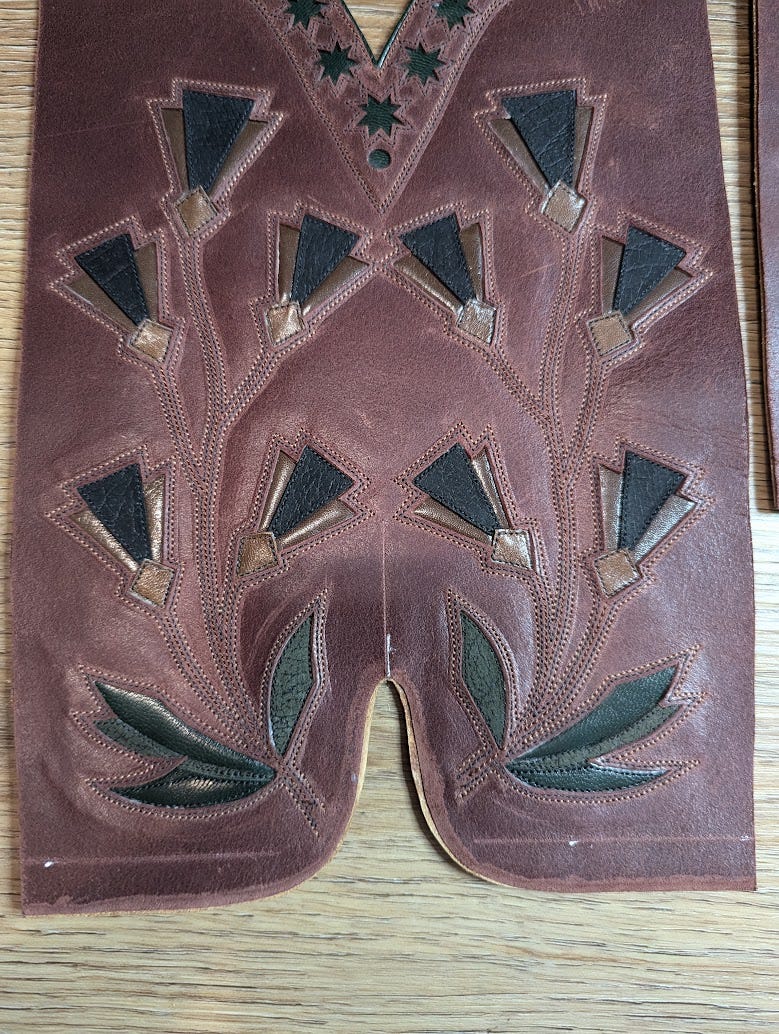
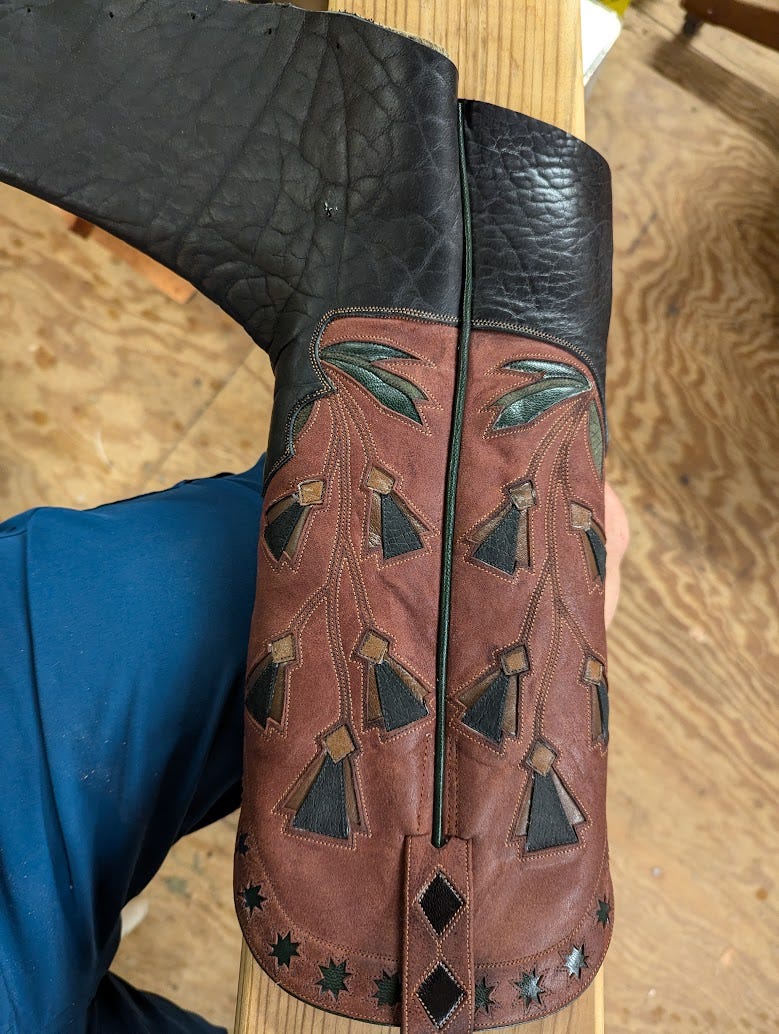
Keep in mind, any additional complexity in the pattern gets multiplied very quickly. I used a cool and simple geometric flower pattern here, forgetting that I would have to do it four times per boot. I might have made the pattern a bit more simple if I was thinking about that level of effort.
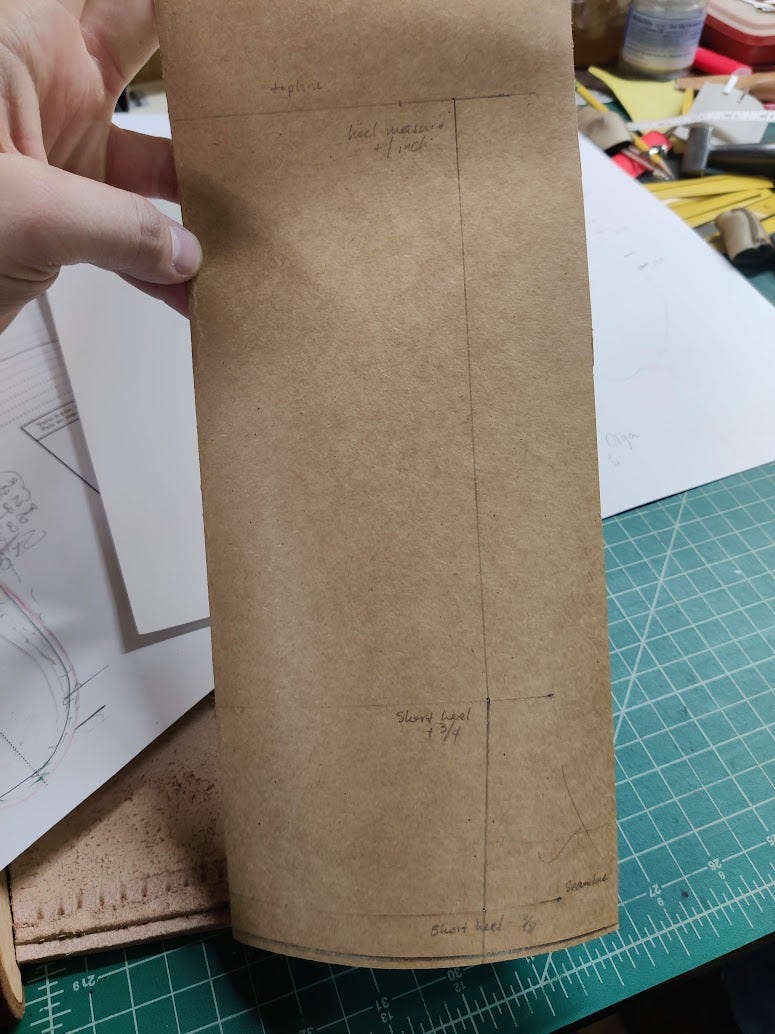
For the top pattern, you mainly need the short heel measurement (measuring tape wrapped around the instep and heel).
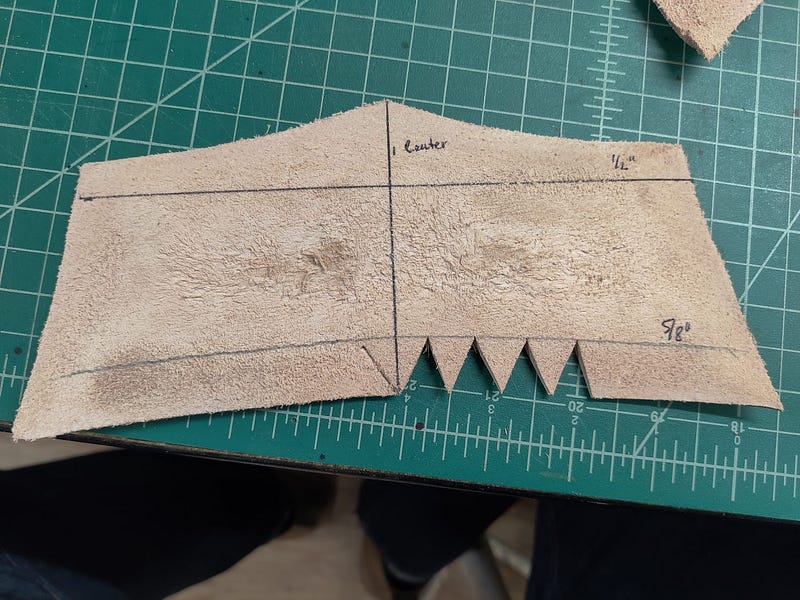
I used a piece of paper folded in half for my initial pattern drawing. The first line (from the bottom going to the top) is called your seam line and it should be 1/2" up (the 1/2" is your seam allowance), and it is your short heel - 3/8" wide, divided by 4 since you're doing this pattern in quarters.
The second line is the pass line, up 2 1/2" from the seam line, and it is your short heel + 3/4" divided by 4, wide.
The top line should just be whatever height you want your boots to be, measured from the seam line. Horizontal measurement is short heel + 1" divided by 4.
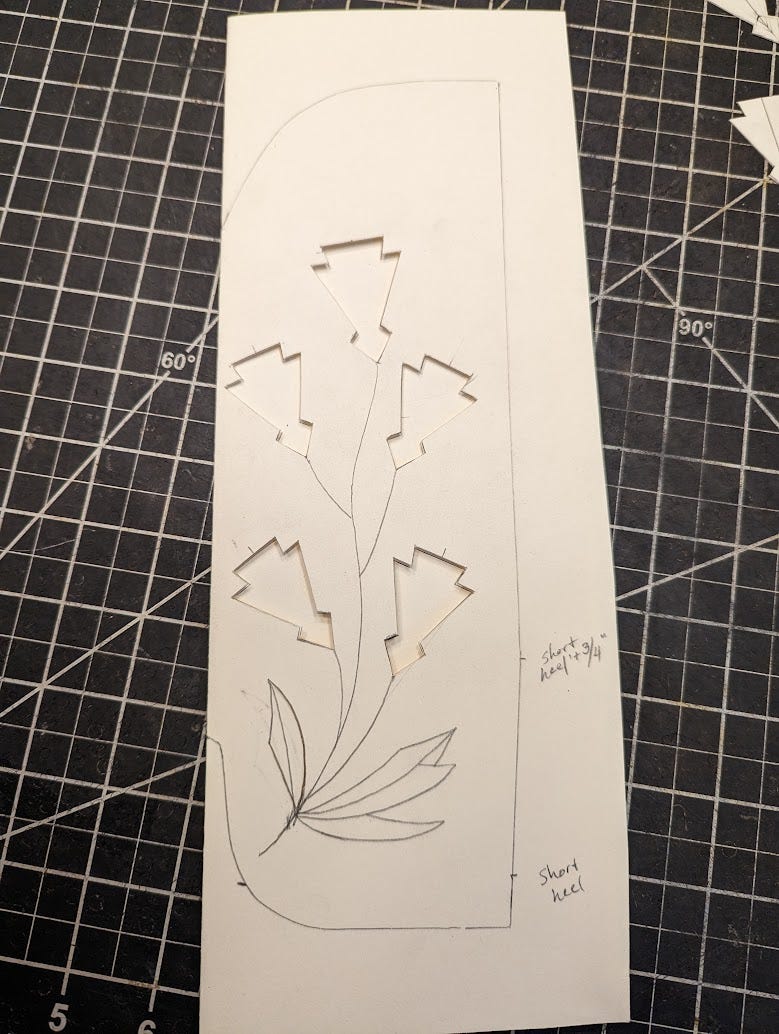
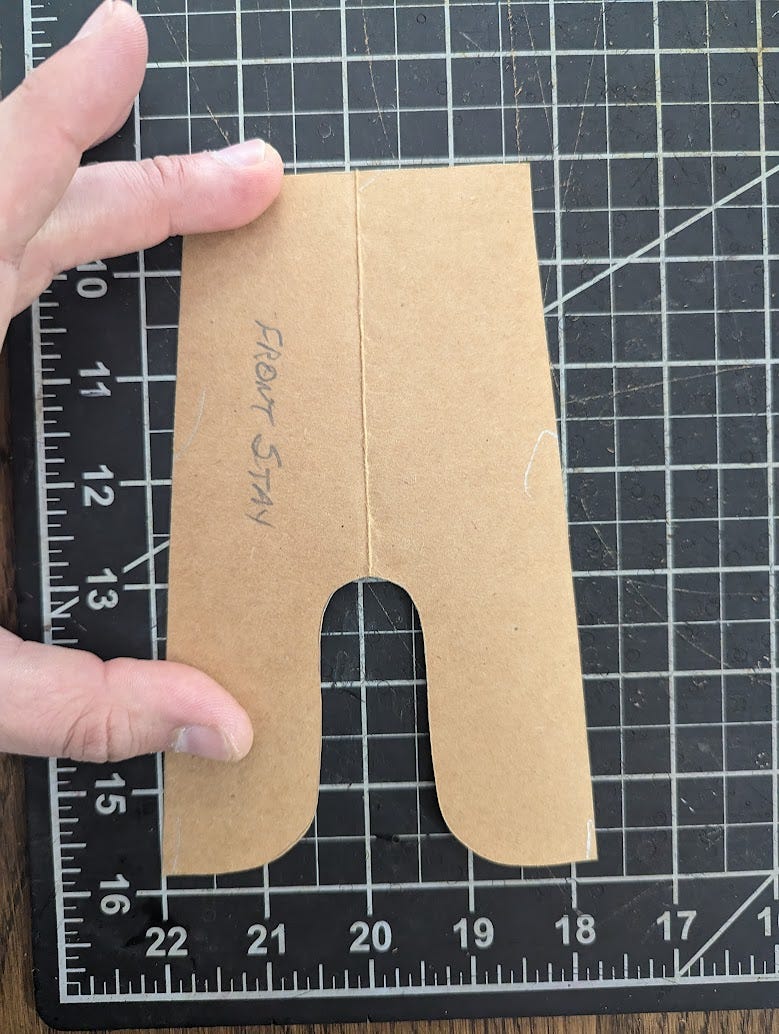
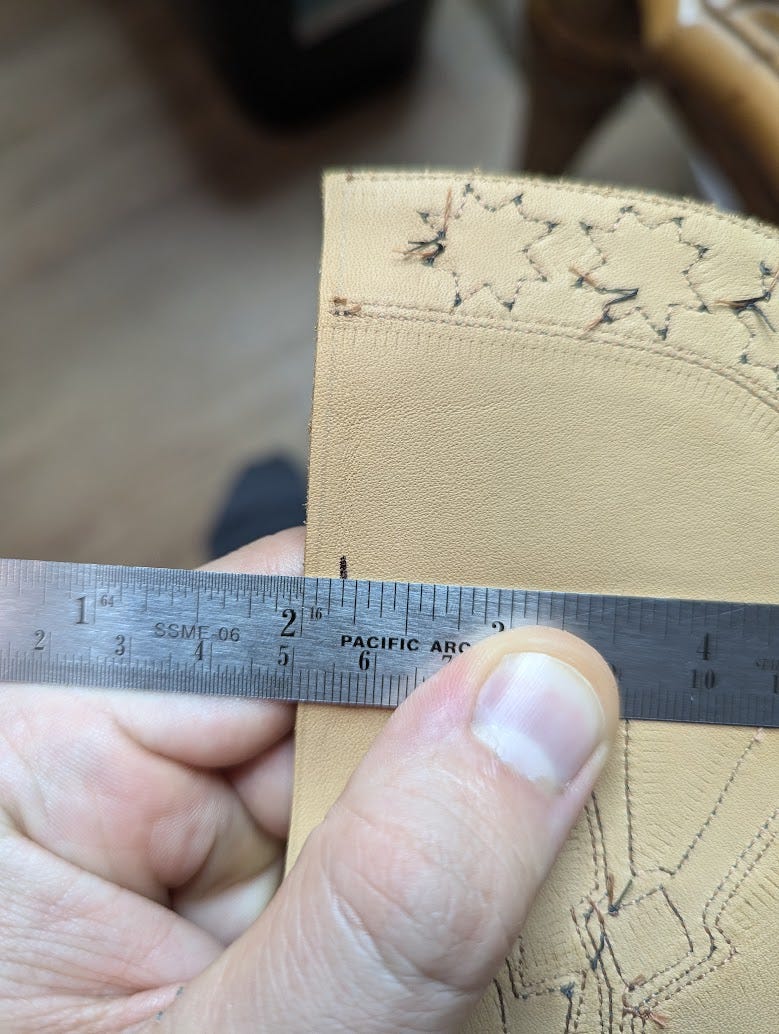
The front pattern has an opening for your foot. From the pattern I copied, that is about 5.2 cm up from the bottom line, and flares out to about 1.3 cm (from center line) at the seam allowance line.
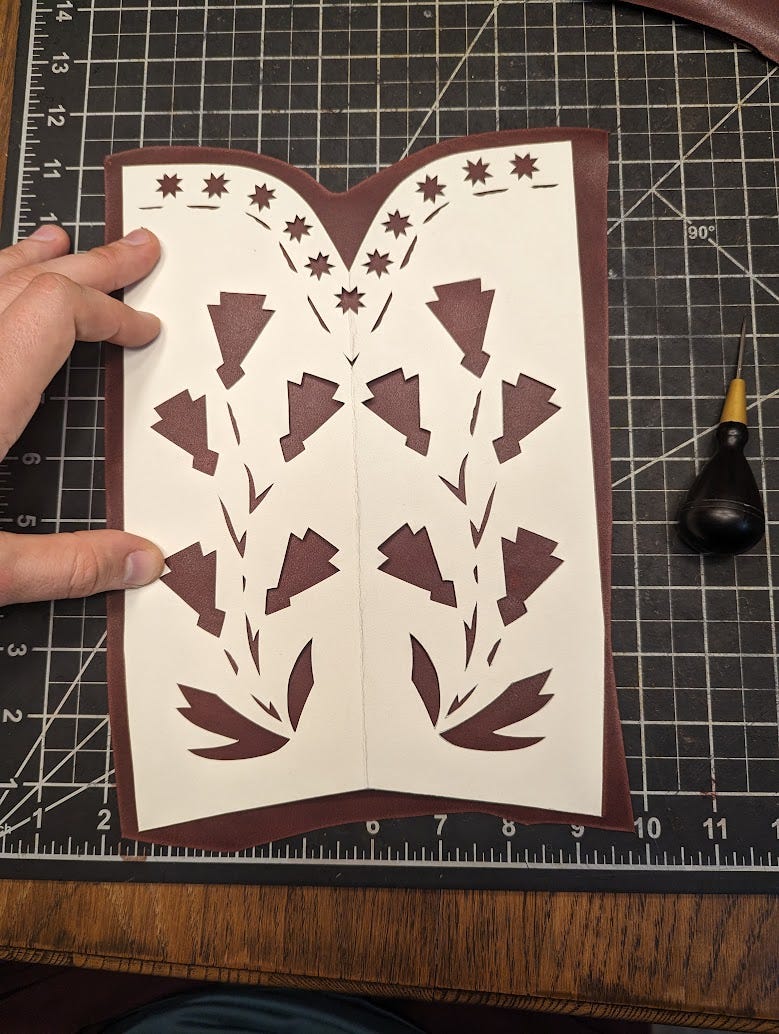
From here, draw out your pattern on a folded piece of paper. Make sure to leave at least 1.5 cm along the edge empty, so that your side seam doesn’t overlap your design. There are several methods to transfer your design to leather. Some makers stitch over their pattern with an empty needle to perforate it along the lines, then use some talc powder to transfer the pattern on to the leather. Here, I just cut out the pattern first so I can trace it out for the pattern for the back of the boot.
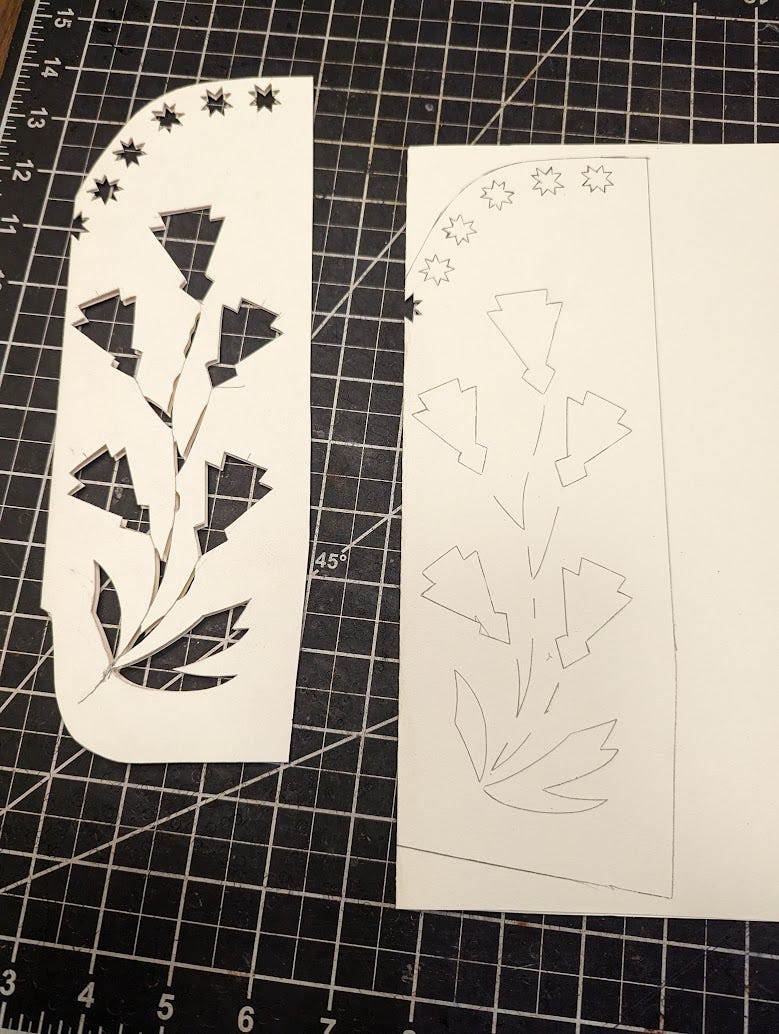
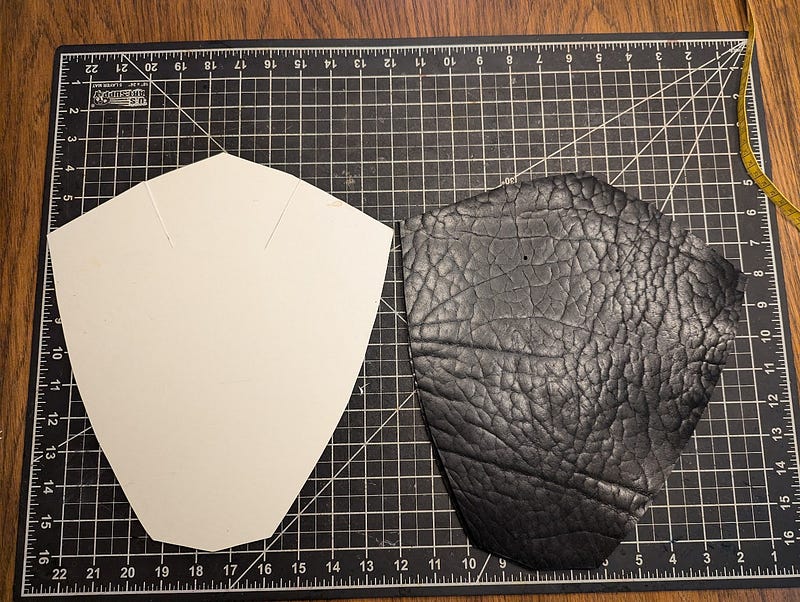
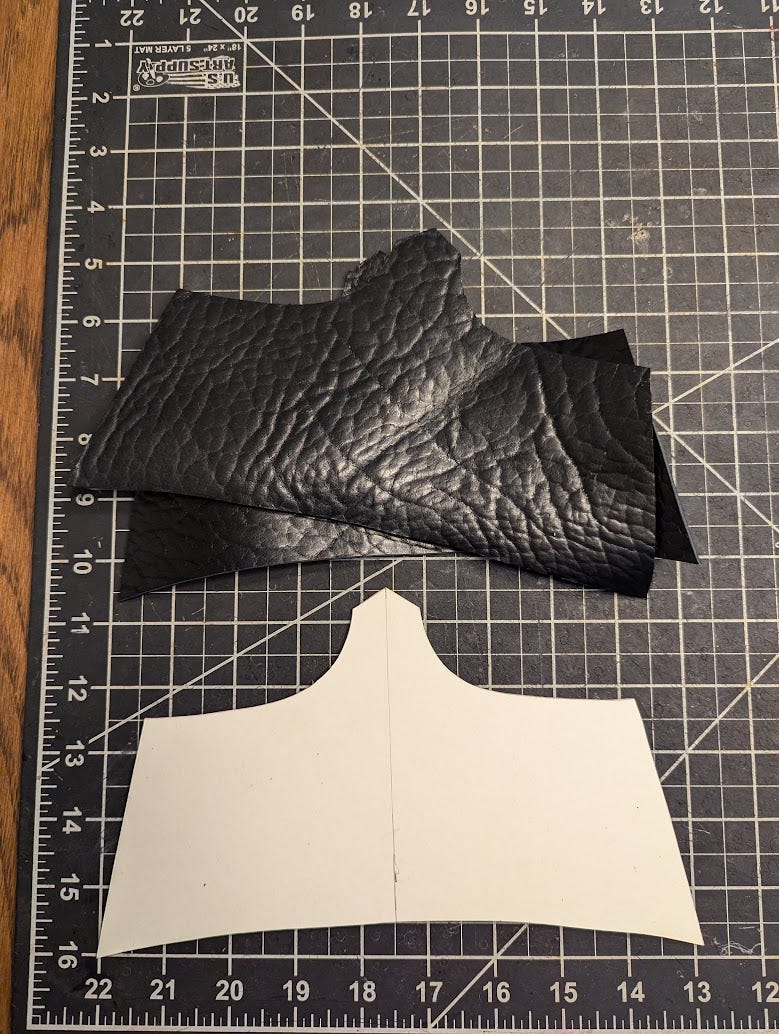
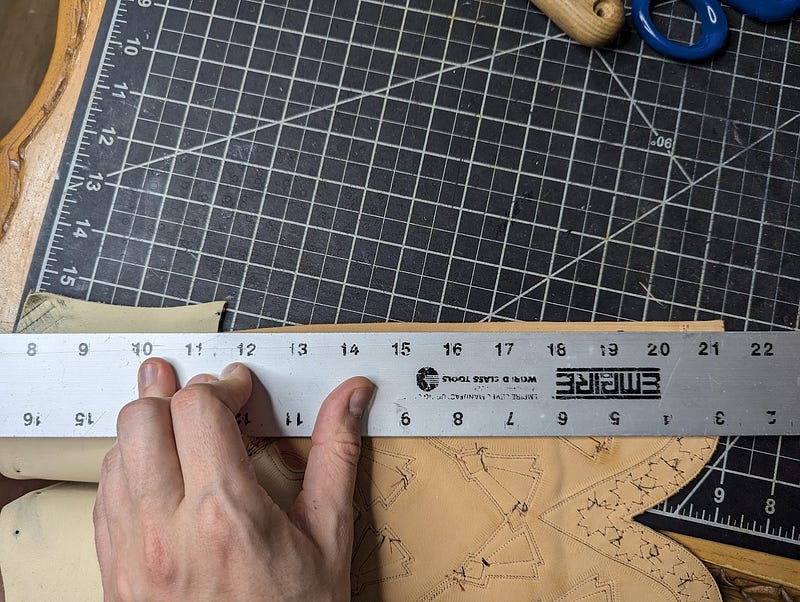
Tracing out the pattern for the back of the boot. It uses the same pattern, just a different shape at the base. The top of the angle is about 1.5 cm from the bottom line.
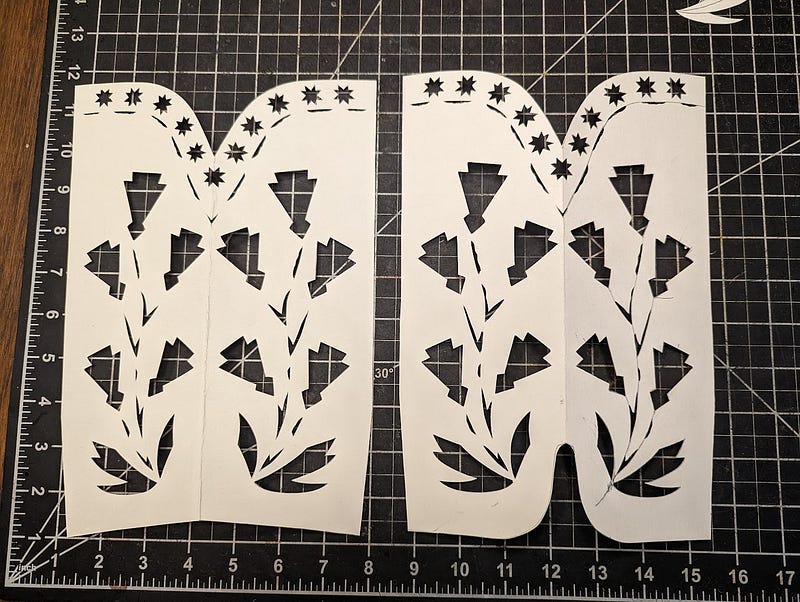
Back and front patterns cut out (left to right).
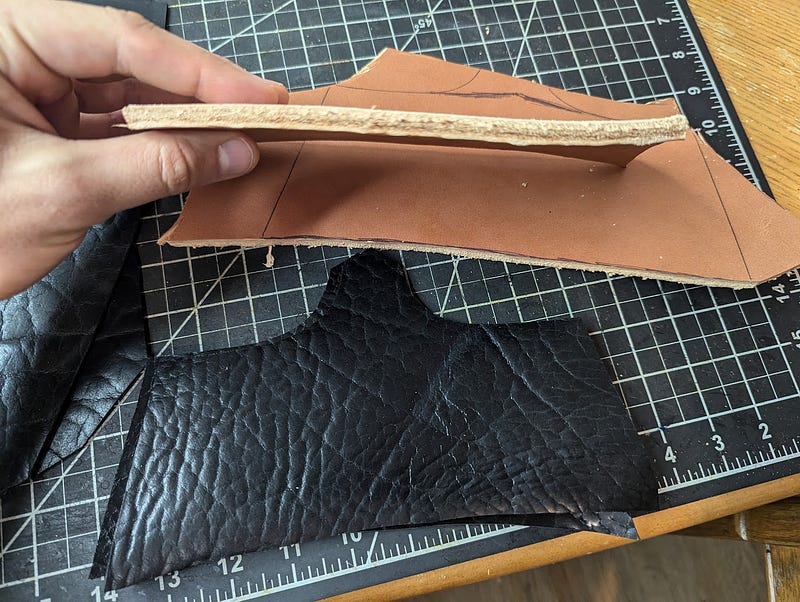
For this pair, I am using some waxed flesh kangaroo for the tops, so it was easy for me to use an awl to mark the stitch lines. There are several methods to cutting out the patterns. One of the most precise ways is to have a cutting chisel on a sewing machine, it’s similar to a sewing needle but with a chisel shaped point. You’d transfer the pattern to the leather using talc then go over it on the sewing machine with the chisel. The advantage there is you have a cut completely through the leather at each point.
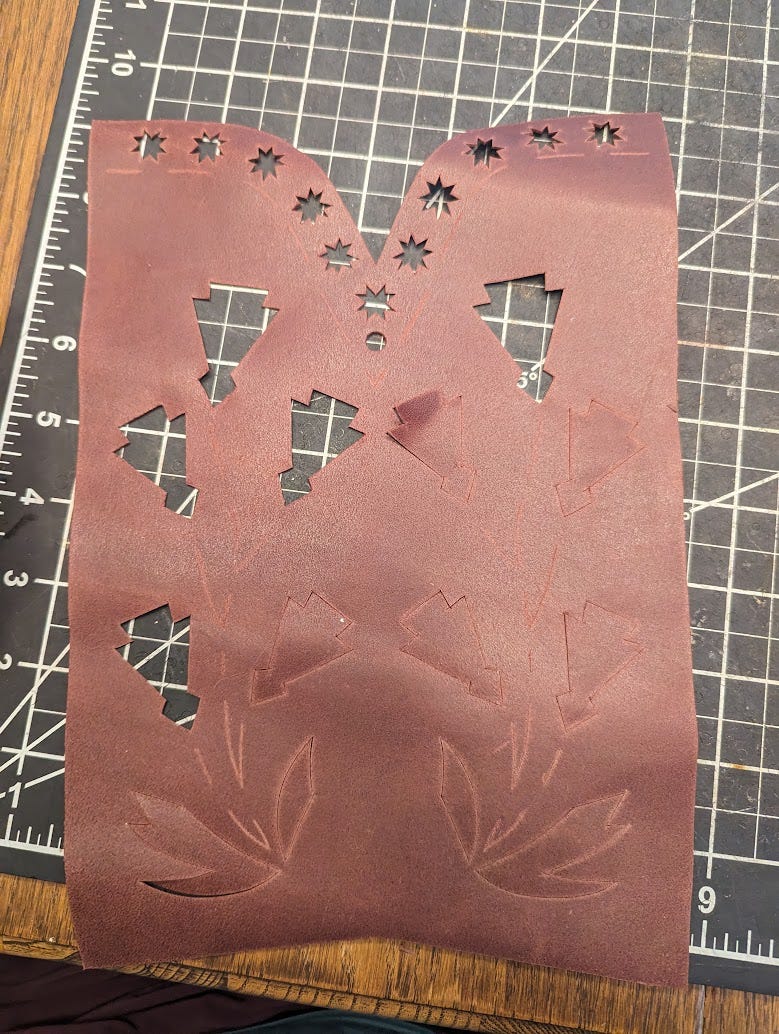
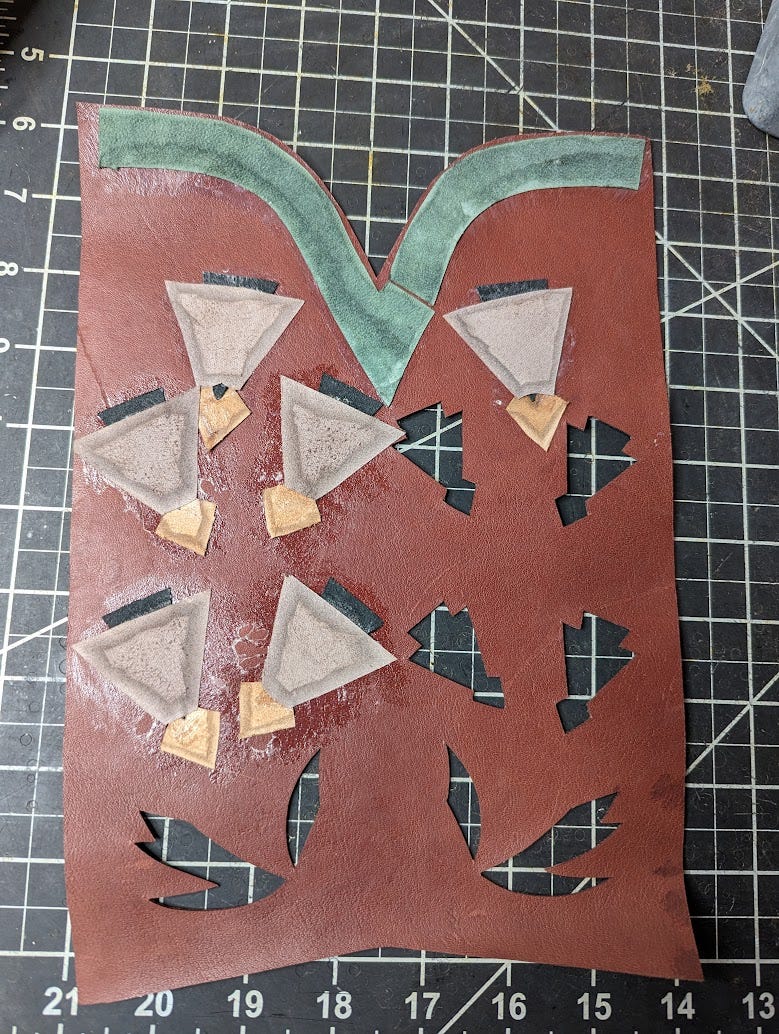
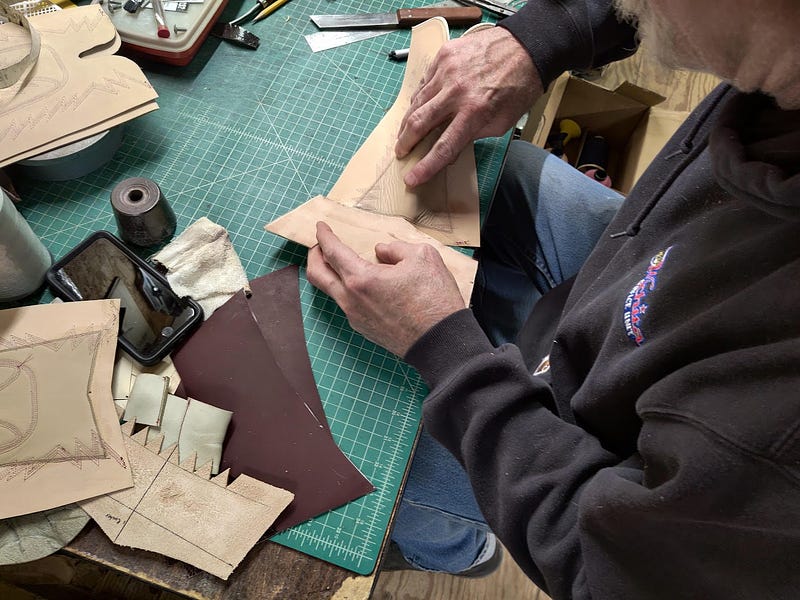
I don’t have one of those, so I just used a clicking knife. It is harder this way because you can’t always cut completely through, so you have to come back in and finish the slice at each corner (being careful not to overdo it!). Here you can see how I made the initial cuts, then I am coming back to finish everything up. I cut this piece out by laying the pattern directly onto the leather, then carefully cutting along the paper. Very painstaking work and you need to be careful that the paper doesn’t shift on you, or that you don’t cut into the paper pattern and screw it up.
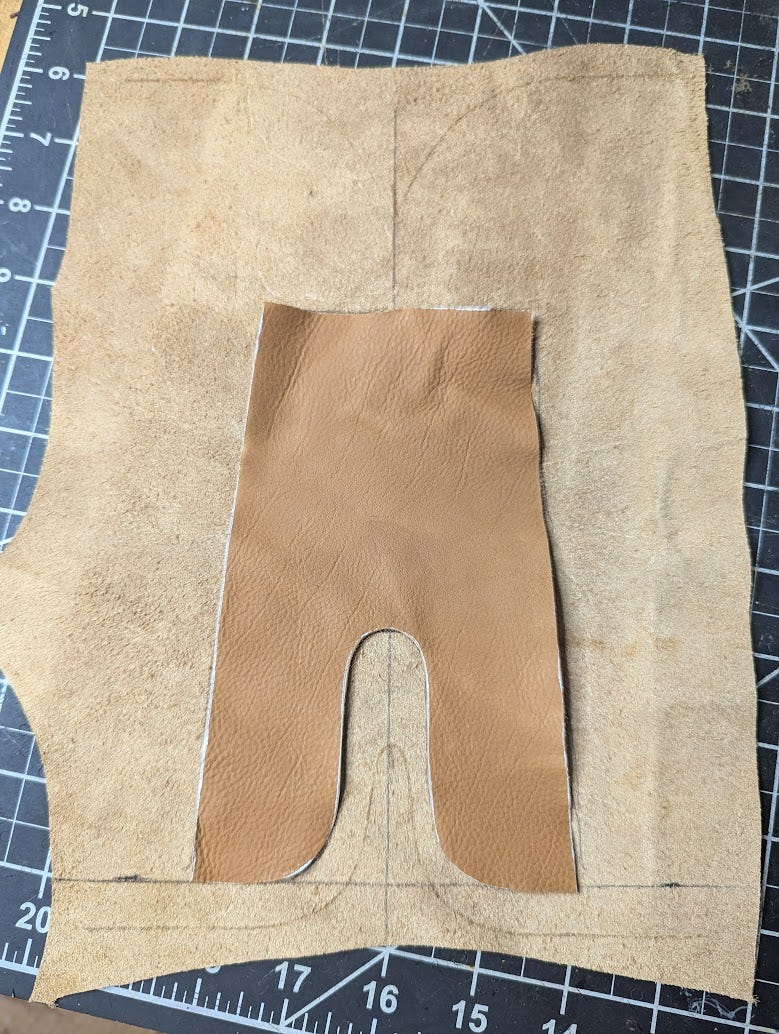
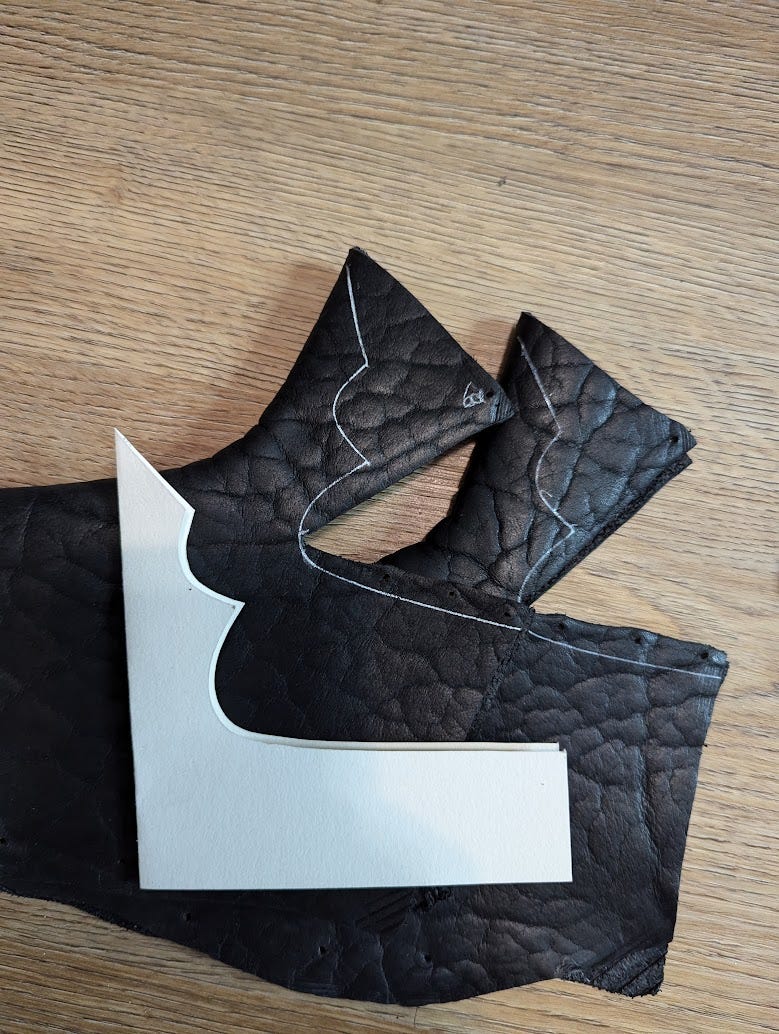
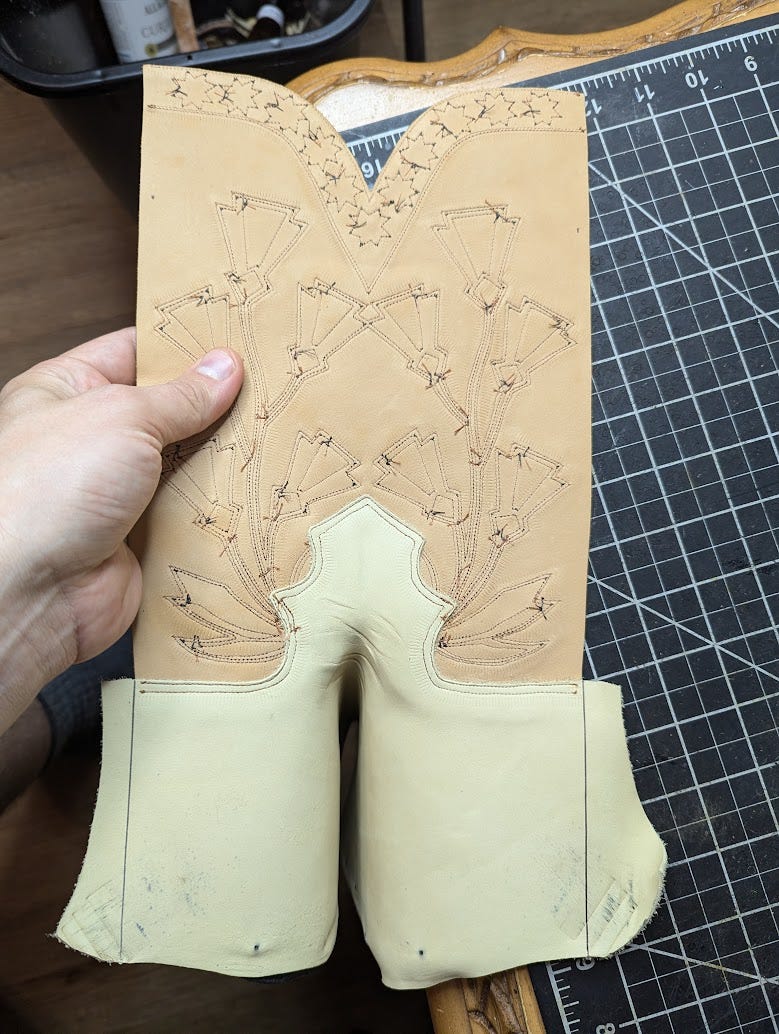
I don’t have any pictures, but I made smaller patterns for each of the flowers based off the pieces that I cut out of the original pattern. Here, I am lining it up to see how everything fits.
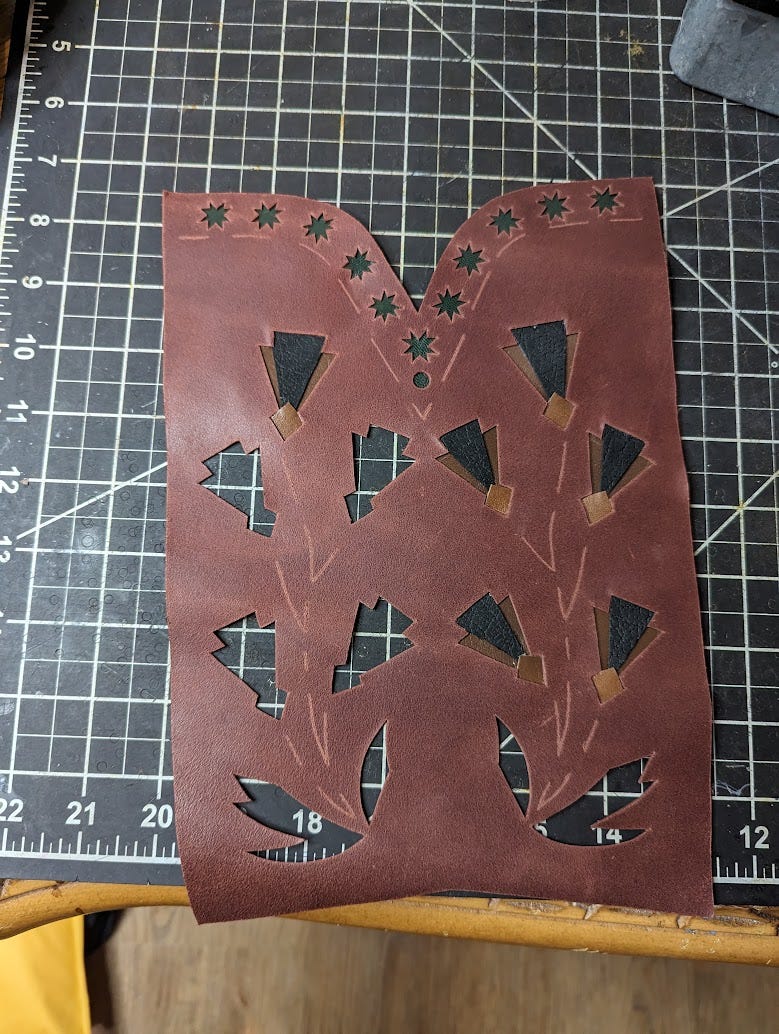
From here, you just cut out all of your inlay pieces and assemble them. Make sure to skive everything down very well! Leather tends to bulk up very quickly if you have several layers. You should also skive down the back of your tops at each cutout to reduce the bulk, but since I used waxed flesh leather, I didn’t want to skive the skin side. Just glue the pieces in with rubber cement or contact cement for now.
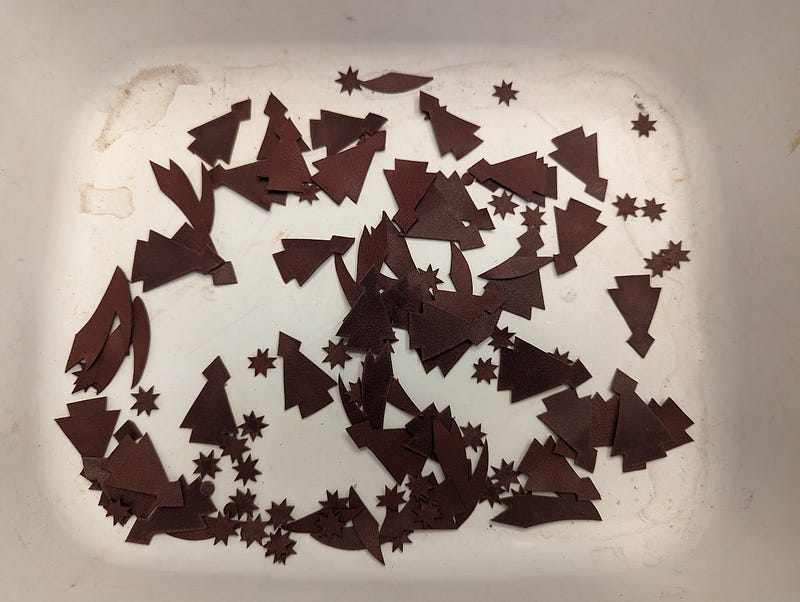
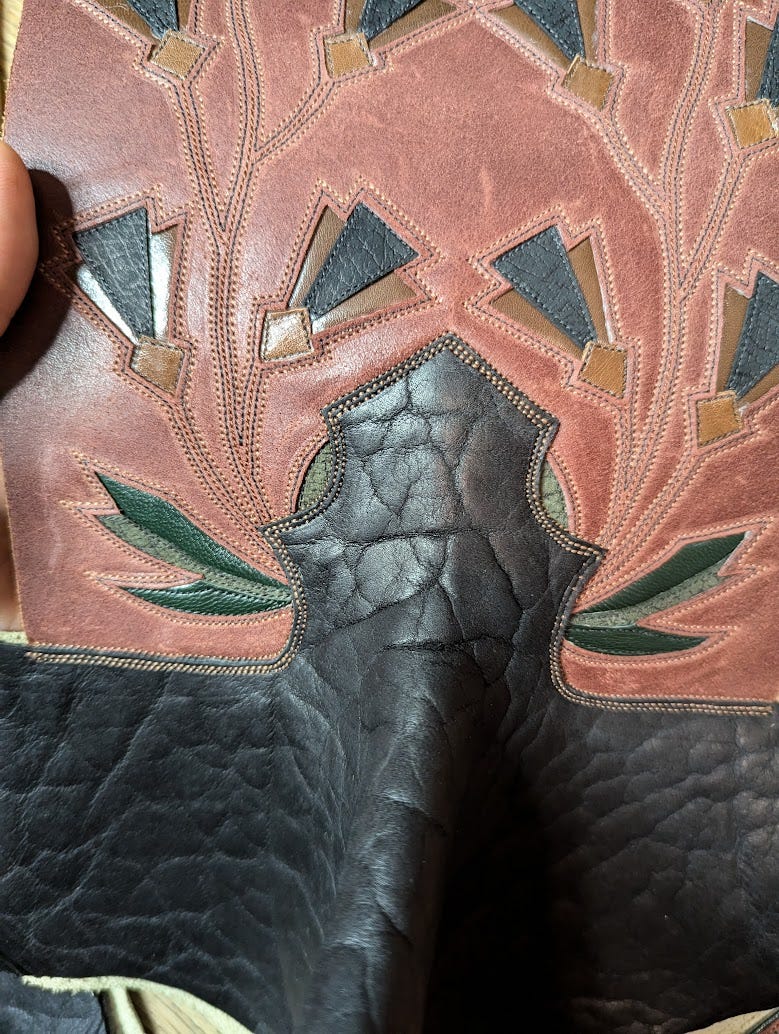
Interesting note if you want to really spend the time to make your inlays pop, save all of your original cut out pieces. After you glue your inlays in, you can line up the original cut out behind it. Then, once you stitch the inlay in, it will have a 3D effect with the inlay pushing outward. I didn’t do that for this pattern, you can see why…
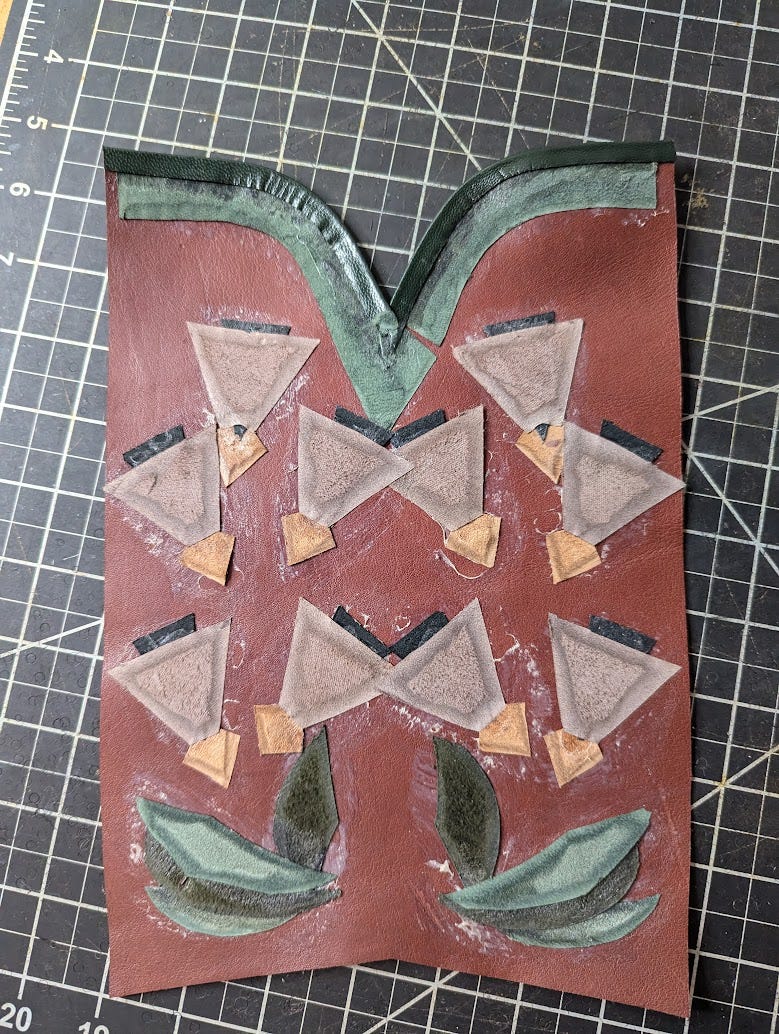
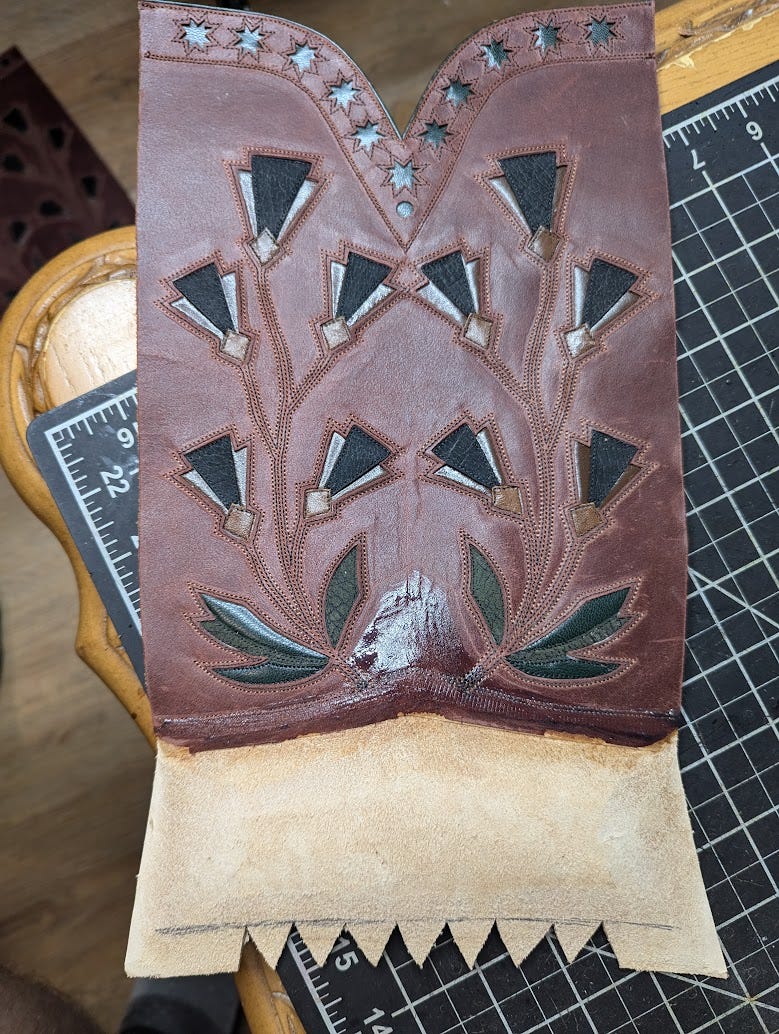
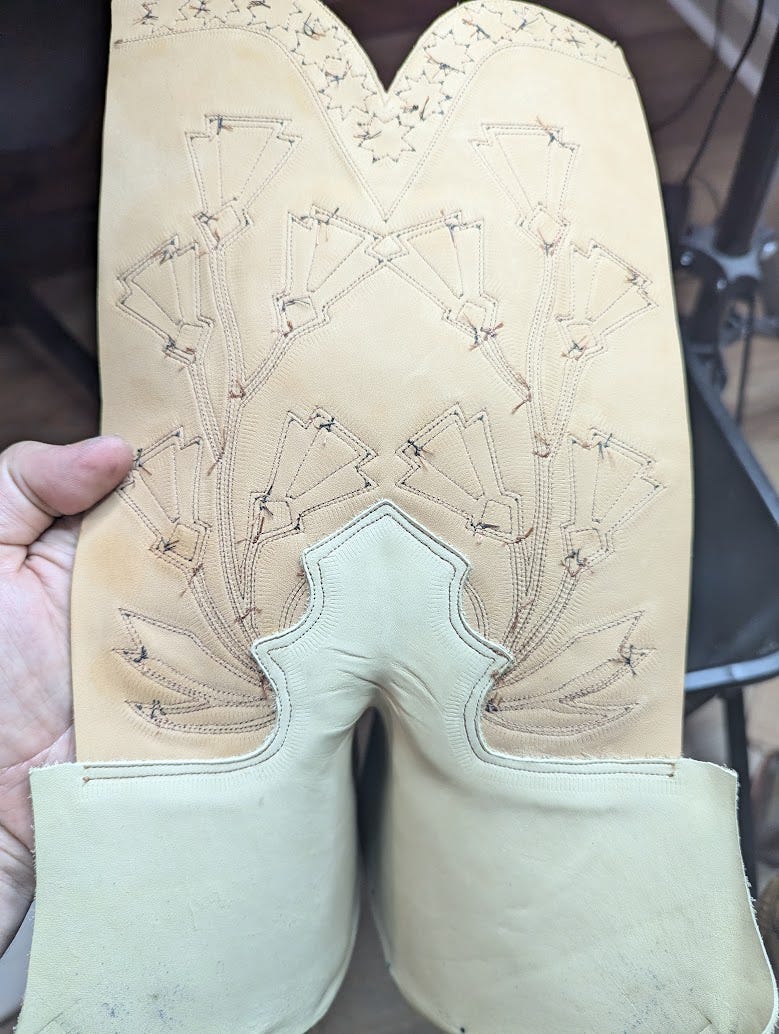
Here is a picture of one of the top pieces with all of the inlay glued in, don’t forget to add your top line beading at this stage.
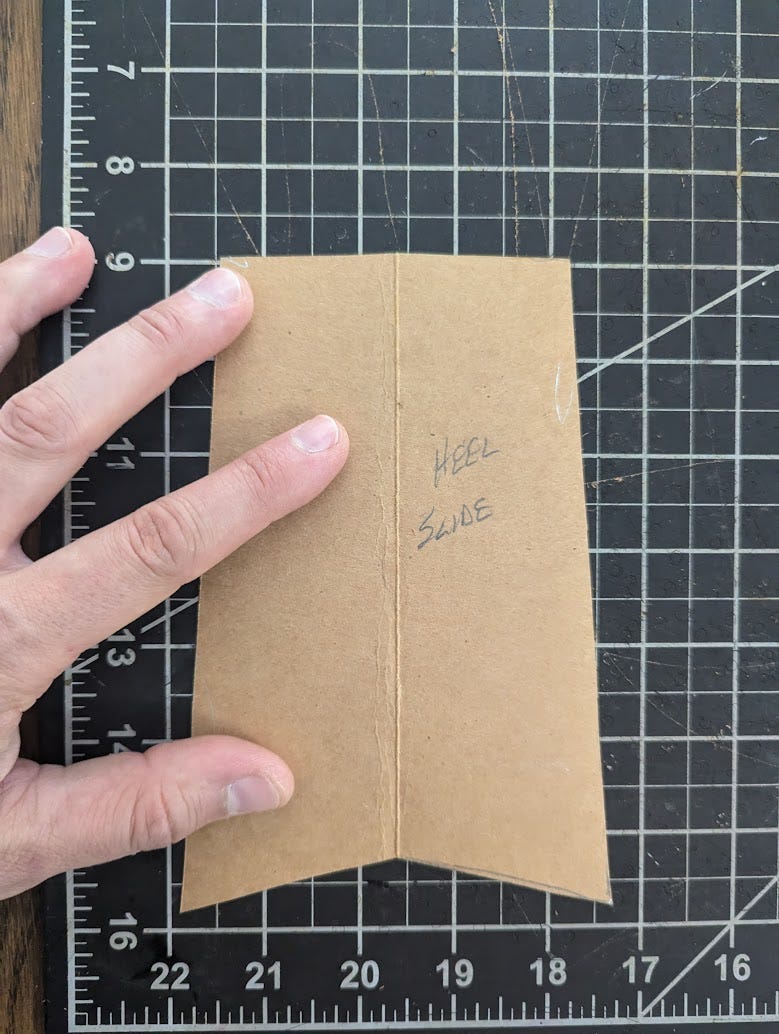
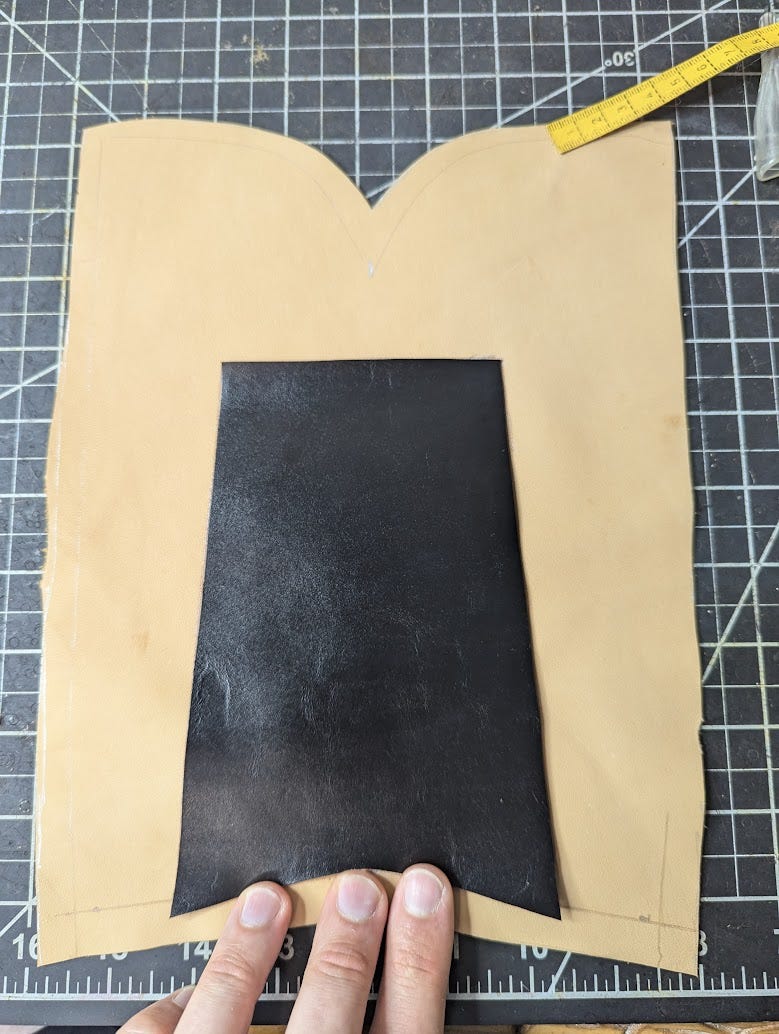
At this stage, you need to make sure you get a heel slide and front stay cut out. For the front stay, I just used an extra piece of lining leather, it will be sandwiched between the tops and the lining anyway and is there to add a bit of reinforcement. The heel slide should be a more sturdy leather that is a little bit slippery, it is there to protect the lining leather from your heel rubbing on it every time you put the boots on. I used a thin baby calf leather.
Make sure you skive everything down, then glue in the front stay centered, along the seam line.
Same thing for the heel slide, except it will be on top of the lining. You can stitch your heel slide in at this stage.
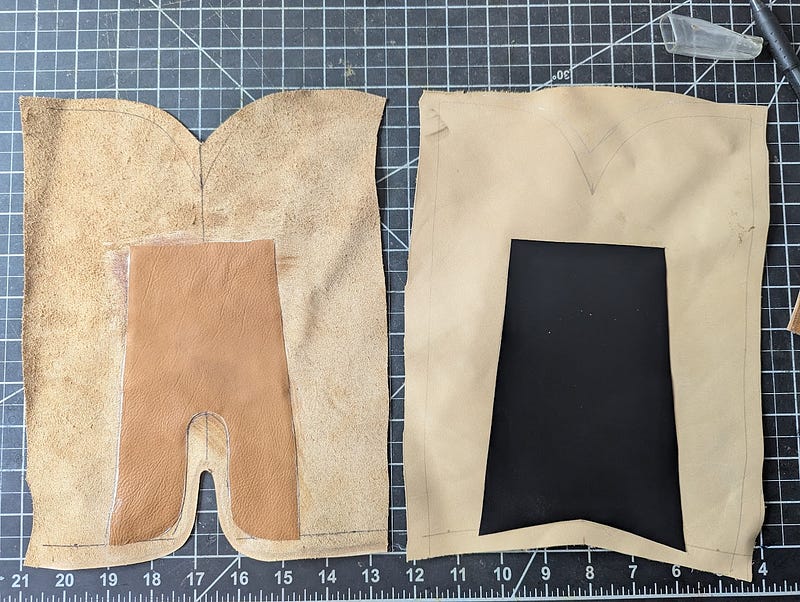
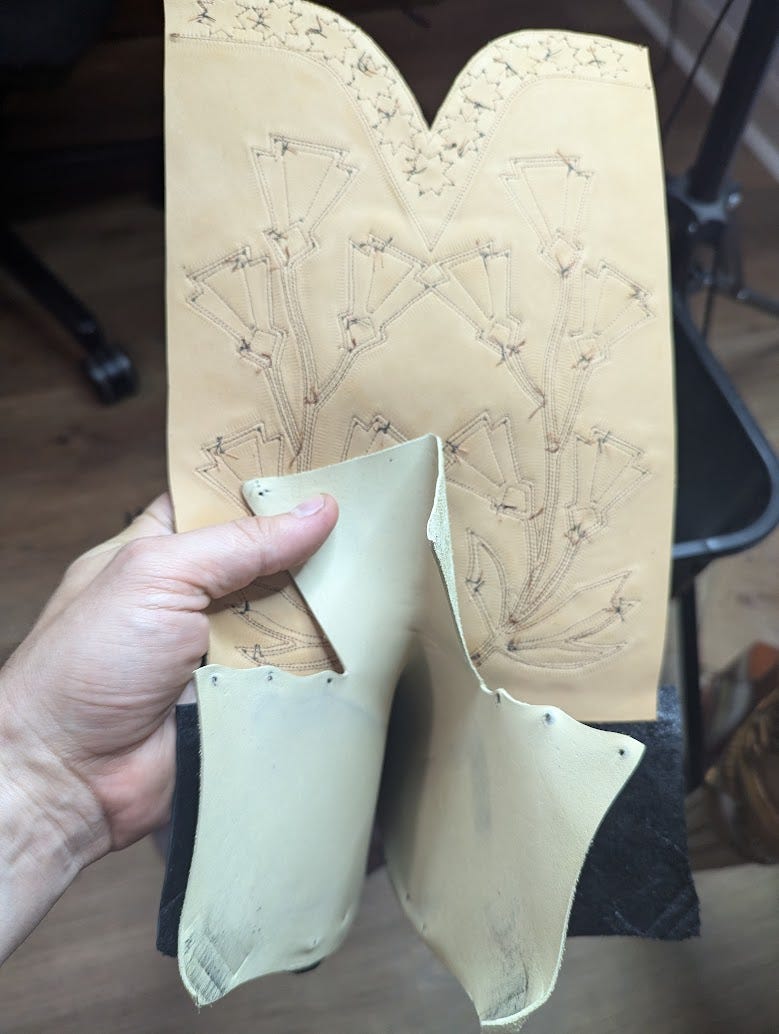
The lining, ready for attaching to the tops. I left extra material on the sides and top top make it easier to line up and stitch. Make sure to skive well along the bottom.
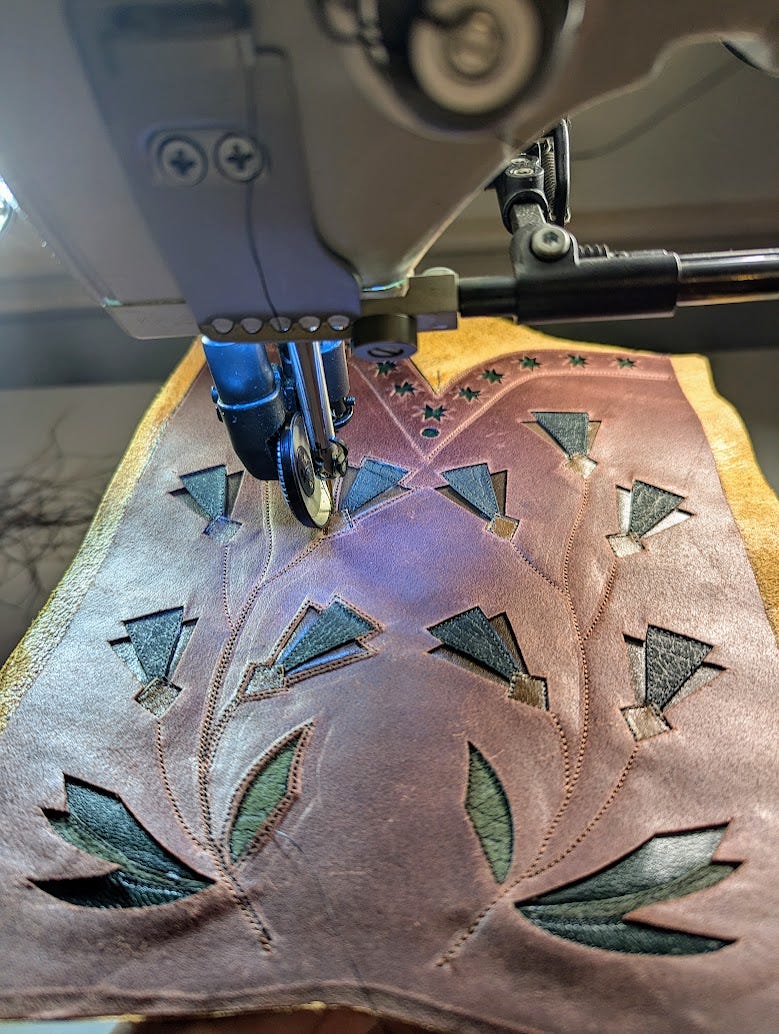
At this stage, you just glue the tops to the lining and start stitching!
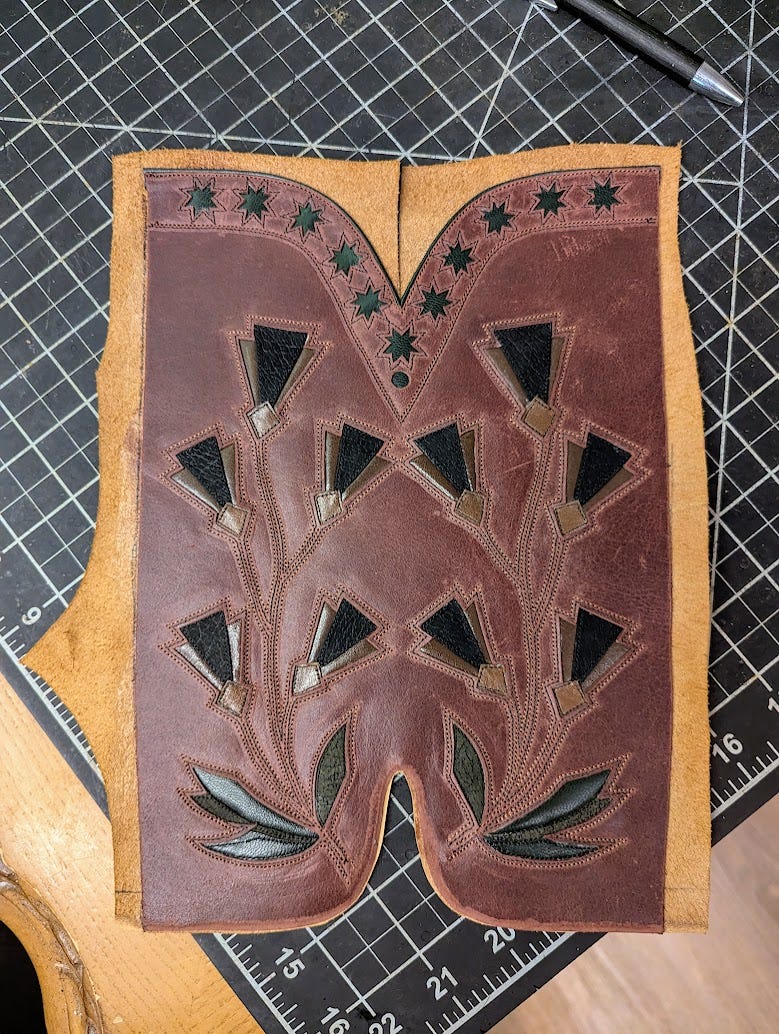
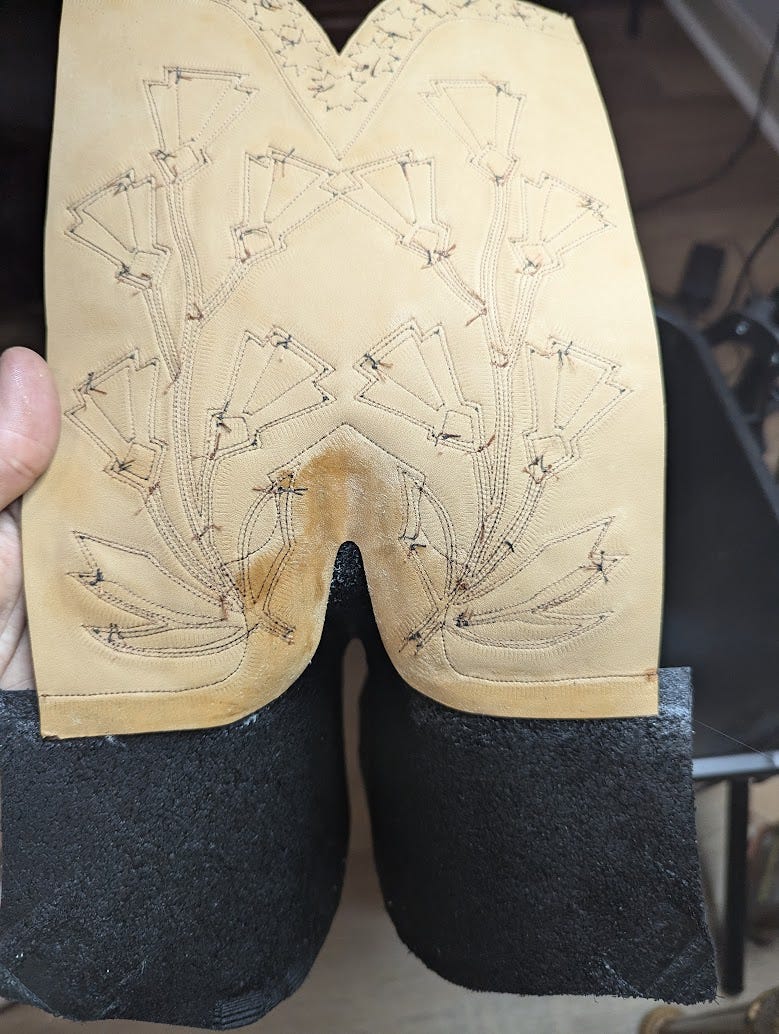
Here is a finished top, the only thing left is to trim the extra lining. Nothing quite like making a pair of cowboy boots for sewing practice!
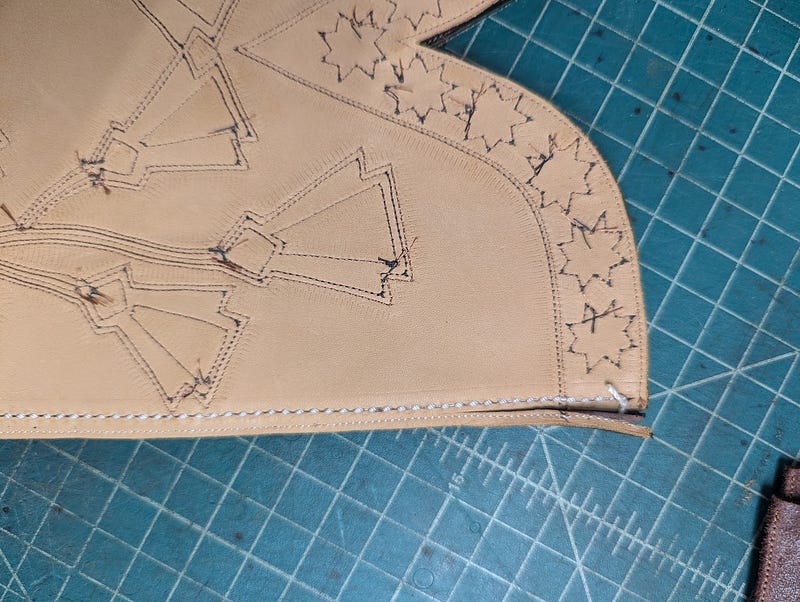
If you are doing multiple stitching rows, make sure to “pull your points” i.e. at every angle here, you have to extend the stitch line a bit more than you think you should, to give a nice crisp corner. This is especially true for the points along the leaves at the bottom.
Also, tie off your thread instead of back stitching. Its more work, but you’ll get neater stitches and won’t have little thread tips poking out. When you tie off your thread, make sure to do a double knot, looping the thread twice at each knot to lock it in.
Here are the vamp and counter patterns. To scale the counter pattern, you just extend it out horizontally. I got these from a friend, but you can just eyeball your own pattern based off these dimensions. The protruding bit on the heel can get a lot more complex if you want to, same with the tongue.
For the hard counter, I just used the same pattern as my counter cover, just came to a point instead of adding the whole back piece. I used a piece of soling leather for the hard counter.
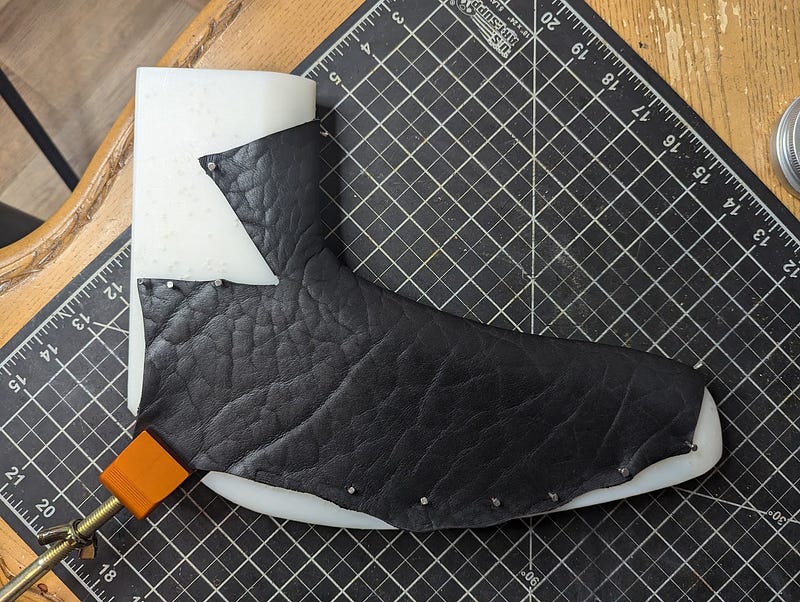
Here is an example of the vamps, crimped. You need to do this for the upper lining as well (using the same pattern as the vamps).
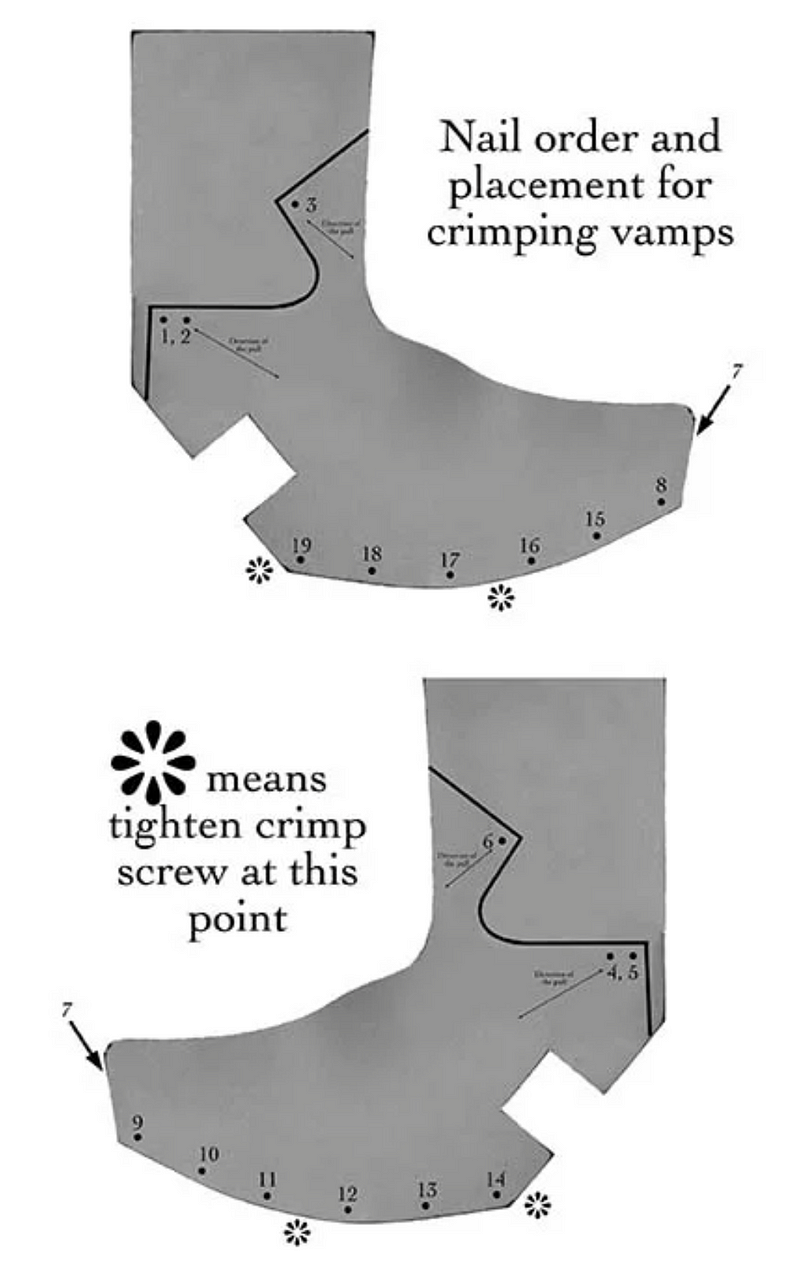
Here is a graphic that Lisa Sorrell created to show the nail order for crimping. Super helpful!
Once your vamps are crimped and dried, cut out the tongues like so. The tongue pattern can be adjusted as needed, the original one I copied from my friend had the tongue too high up, and it covered part of my inlay pattern so I made it shorter.
Back to the hard counter. Skive the hell out of the edges. I took the sander to it at the end to smooth everything out. I used a Landis 5 in 1 to skive , it would be a lot harder with a normal skiving knife. Mark the center line and the seam line on top, it just helps line everything up.
Attaching the hard counter to the tops is a bit tricky, you fold the tops like so, then line it up and attach. Doing it this way will help add curvature to your heel, since there is none in the base pattern (unlike a derby boot, for example).
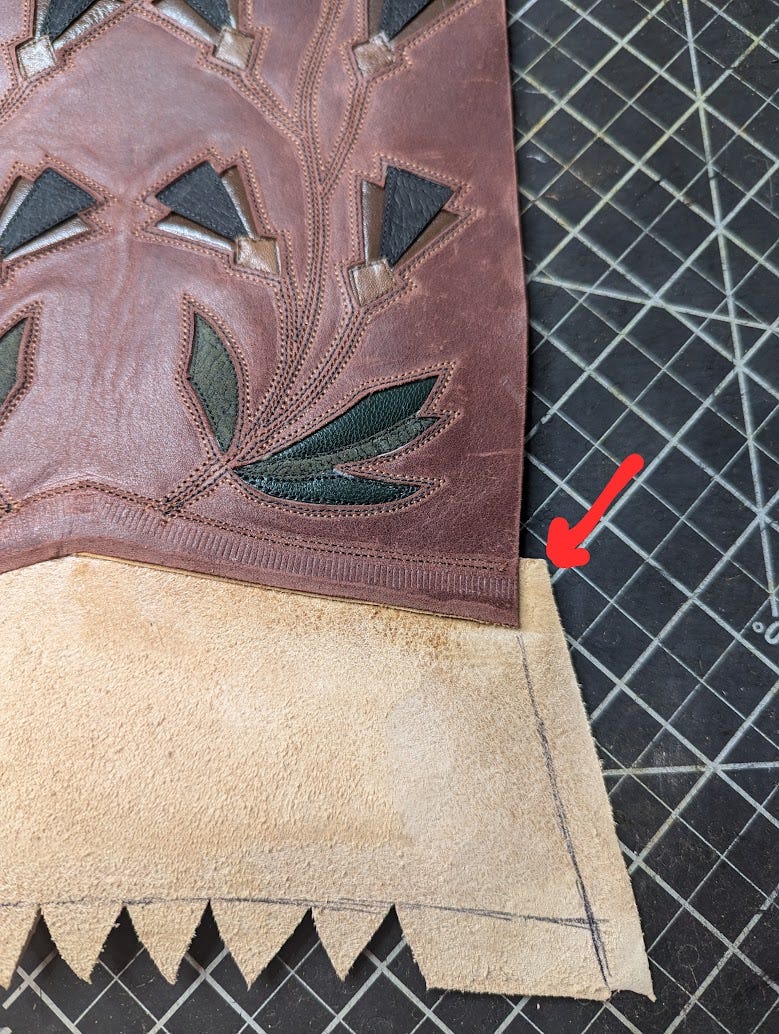
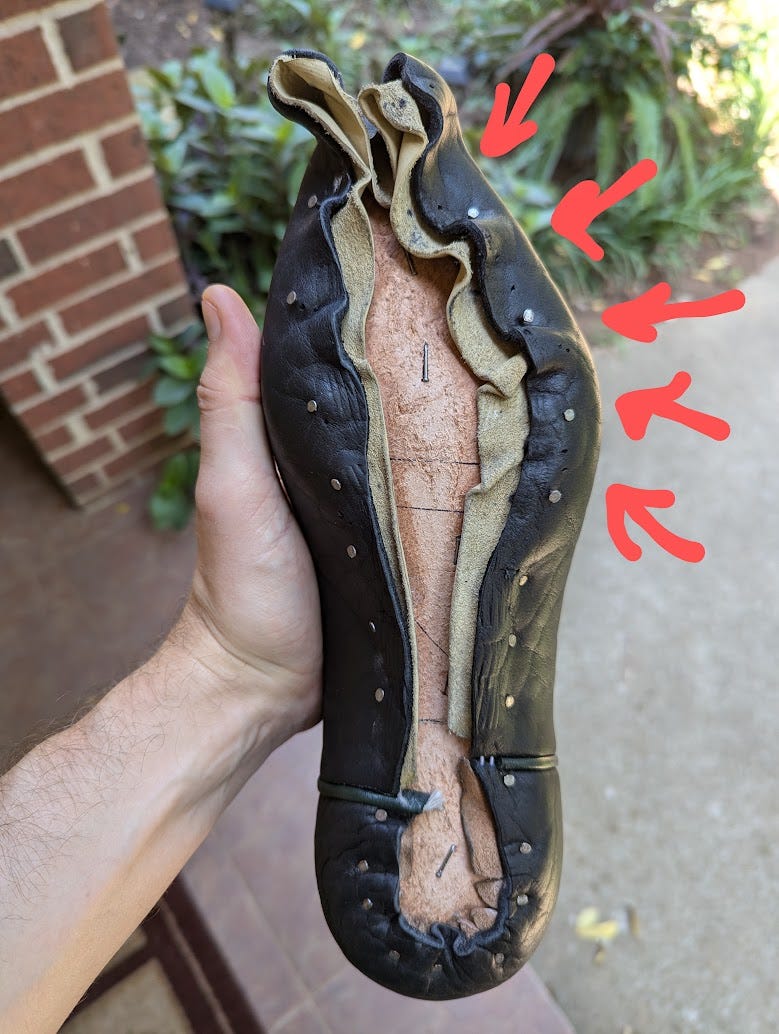
Once you glue it on, do two stitch lines to attach it to the tops. Next, trim the excess. Here you can see one of my mistakes. The line I drew is parallel to the counter pattern, and I trimmed it there. Instead, you’re supposed to start that at the seam line where the red arrow is. It made my final assembly a little bit more complicated. You’ll need to trim the excess on the counter cover as well when you attach it.
Map out how the counter cover is going to be attached, then glue everything down and stitch.
Find your center line and mark out your seam line on the front half of the tops. The tongue should be centered, with the top part of the vamps lining up tho this horizontal seam line. If you use rubber cement to assemble your uppers, you can just glue down the lining at the same time and stitch everything together.
Since I use contact cement (and it is not easily removable), I did one stitch to secure the vamps to the tops, this shows me the outline of where I can glue and attach the lining.
You can see in this picture where I have a stitch line on the tops, along the top of the vamps. That stitch secures the lining. Afterwards I come in and do a third stitch through the vamp and lining together.
Afterwards, trim the excess lining off.
To trim the extra bit off the vamps, mark a line 3/16 in. along the top of the tops.
Extend that line down to your seam line, mark that line and cut the extra off. This is where I ran into trouble with the counters, I had a strange shape here because I trimmed them down from the base of the tops instead of from the seam line.
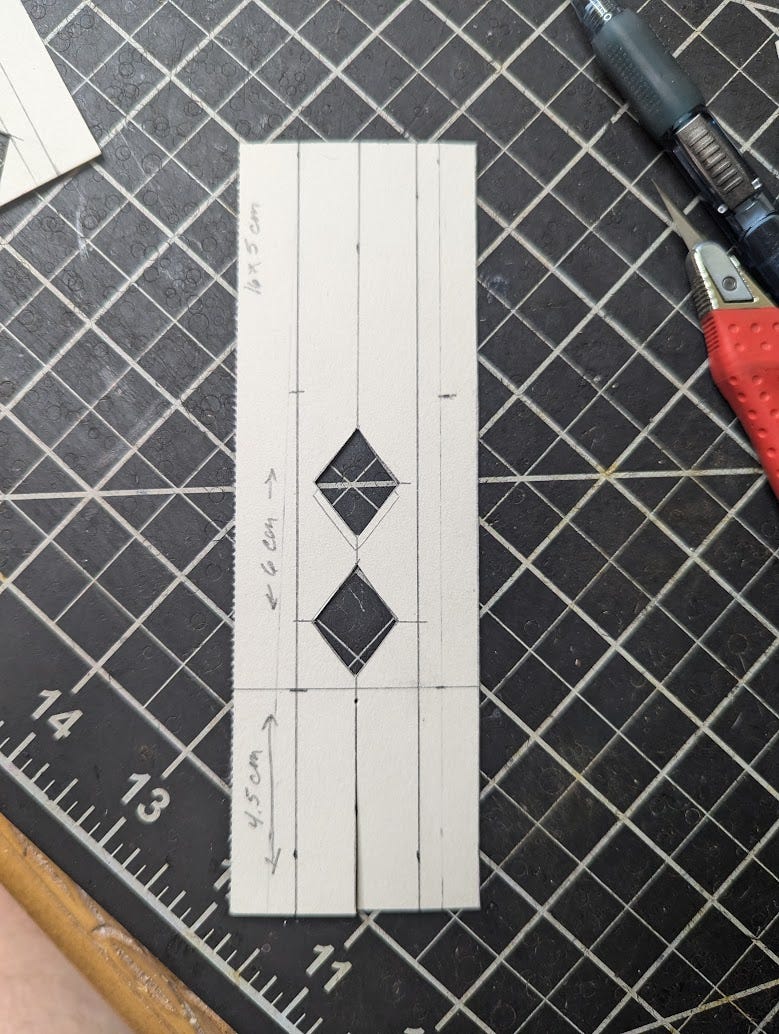
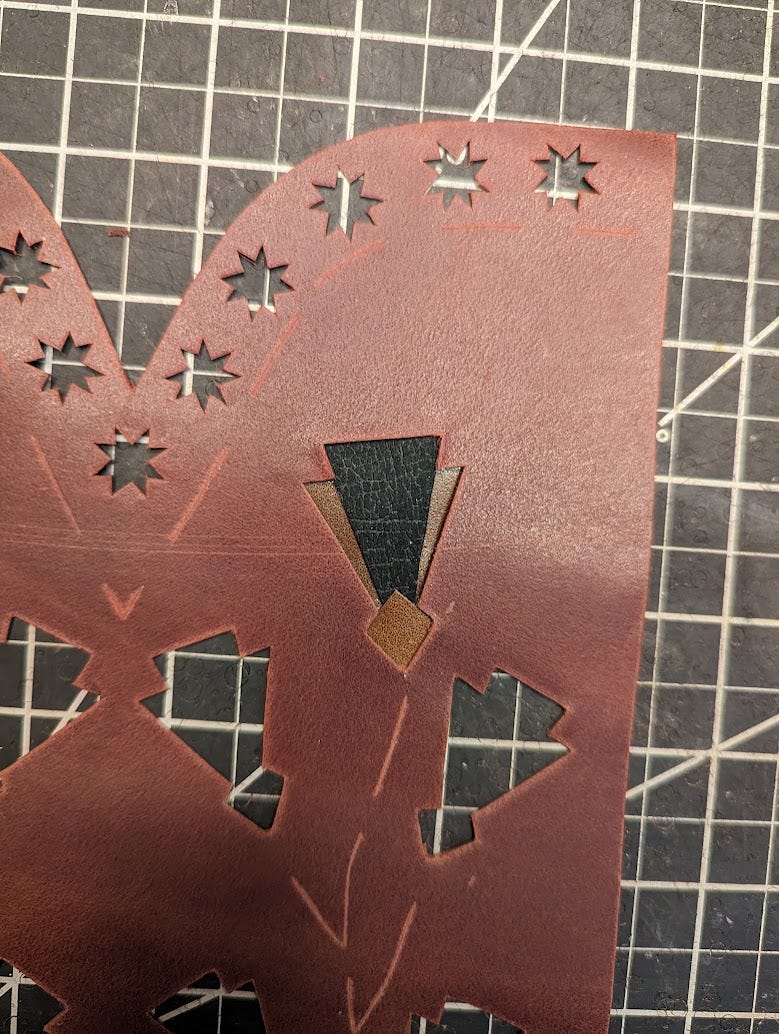
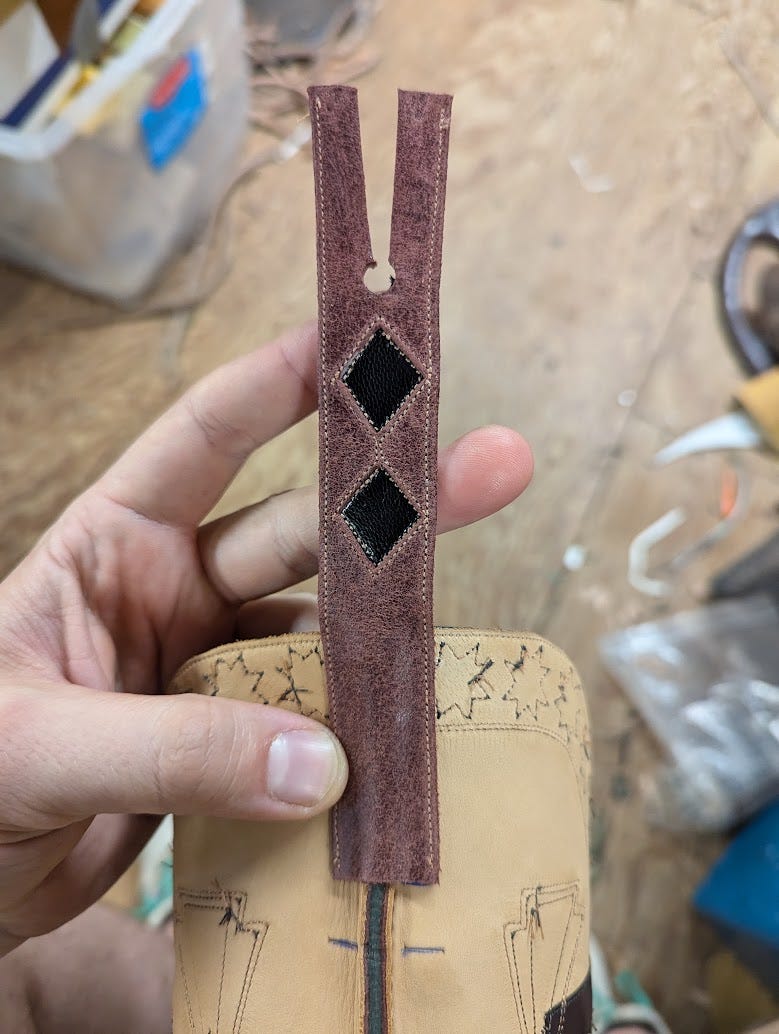
Now for some pull tabs, you will need four of these. This is the pattern I used. You can decorate them however you like. I did an inlay of two diamonds. Mostly because I was just over complex patterns at this point!
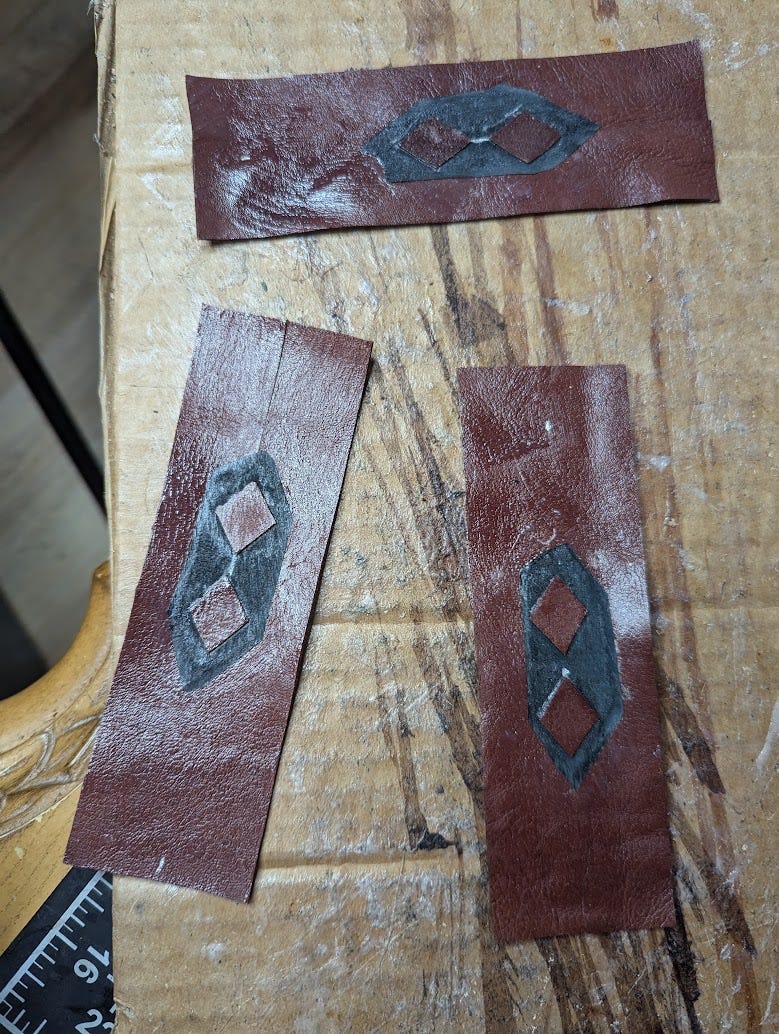
Inlays done. One thing I didn’t do here is add some reinforcement material. Either some nylon tape, or another leather strip in the middle to keep them from stretching.
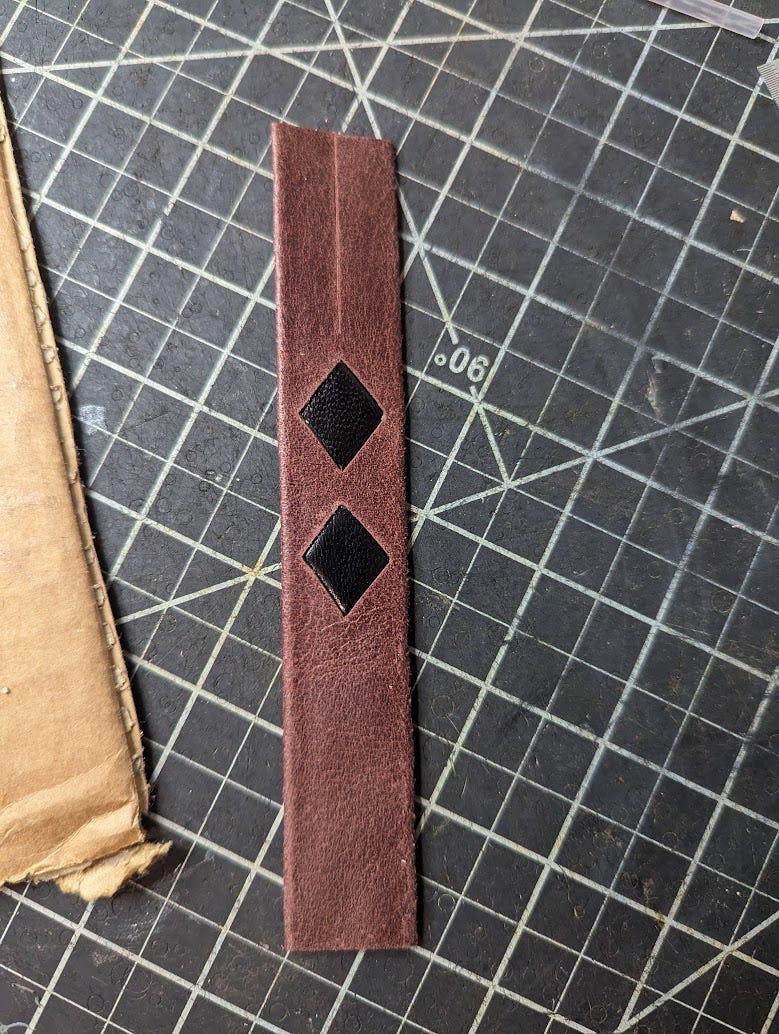
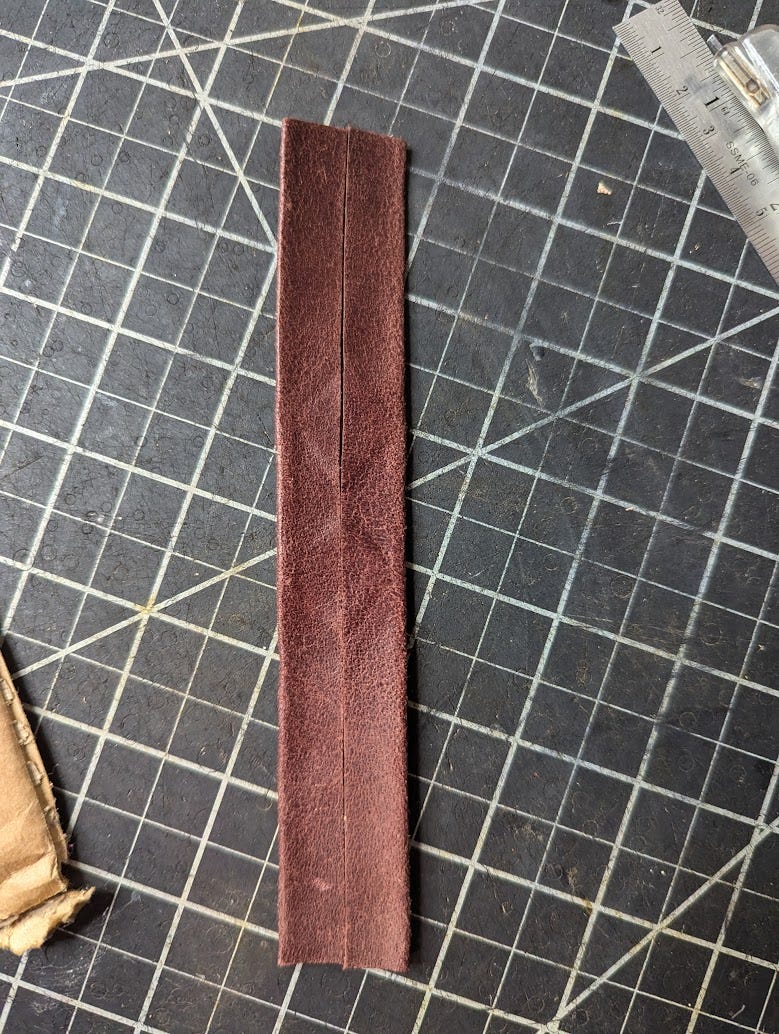
Glue it down and fold it over, then do all your stitching. Make sure to punch a hole where the pull tabs split.
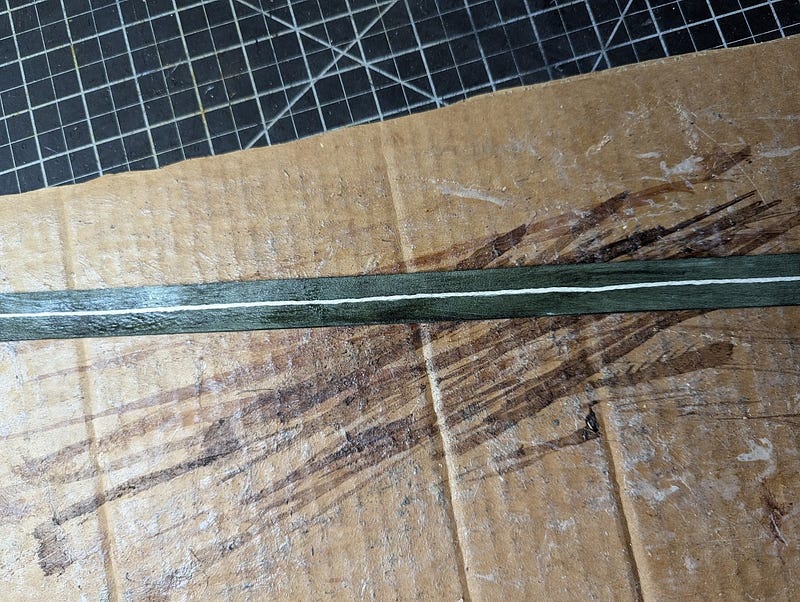
I made my own side welting with a 2 cm strip of kidskin, with some twine in the center to give it some volume.

Attach the side welt to the tops, it doesn’t really matter if you do the front or back half, then stitch it down so it doesn’t slide on you when you combine the two halves.
It is important to line up the to halves correctly. While its still open, line them up (checking from the other end to make sure everything is perfect) then mark where that point is with a pen like so.
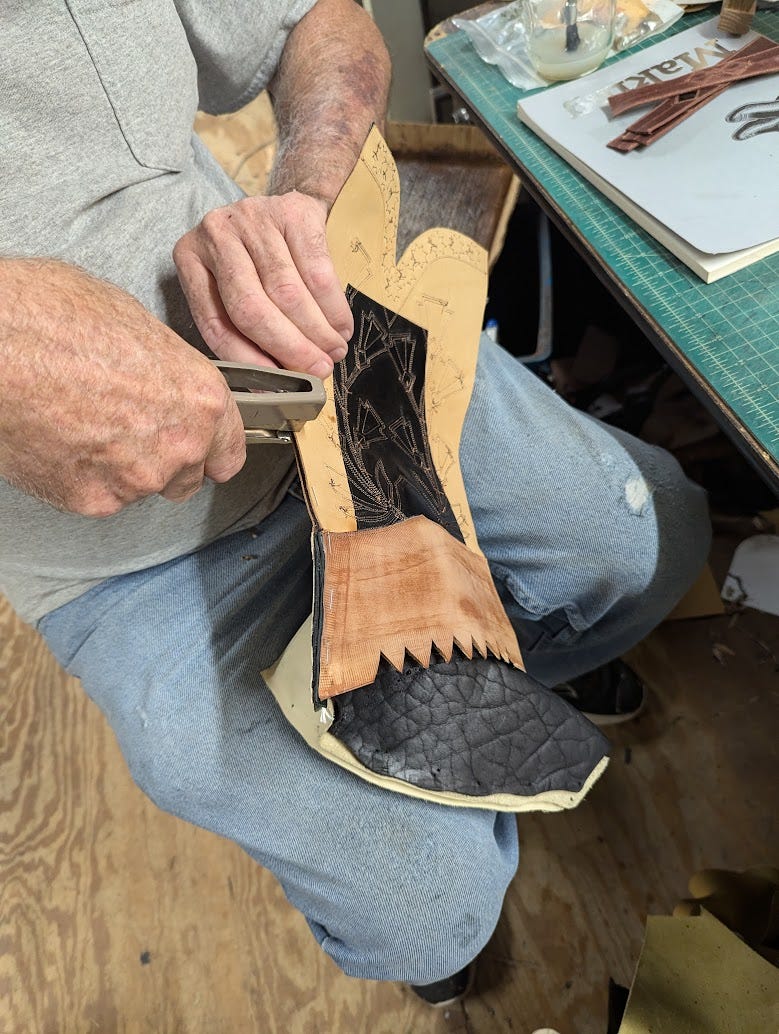
How attach the two halves with a stapler, here is where those marks you made really come in handy because it is very difficult to confirm everything is lined up without them.

Dan, showing me how to use his giga sewing machine.

At this stage, you can hand stitch the two halves together, or if you have access to a huge cylinder arm sewing machine you can use that instead.
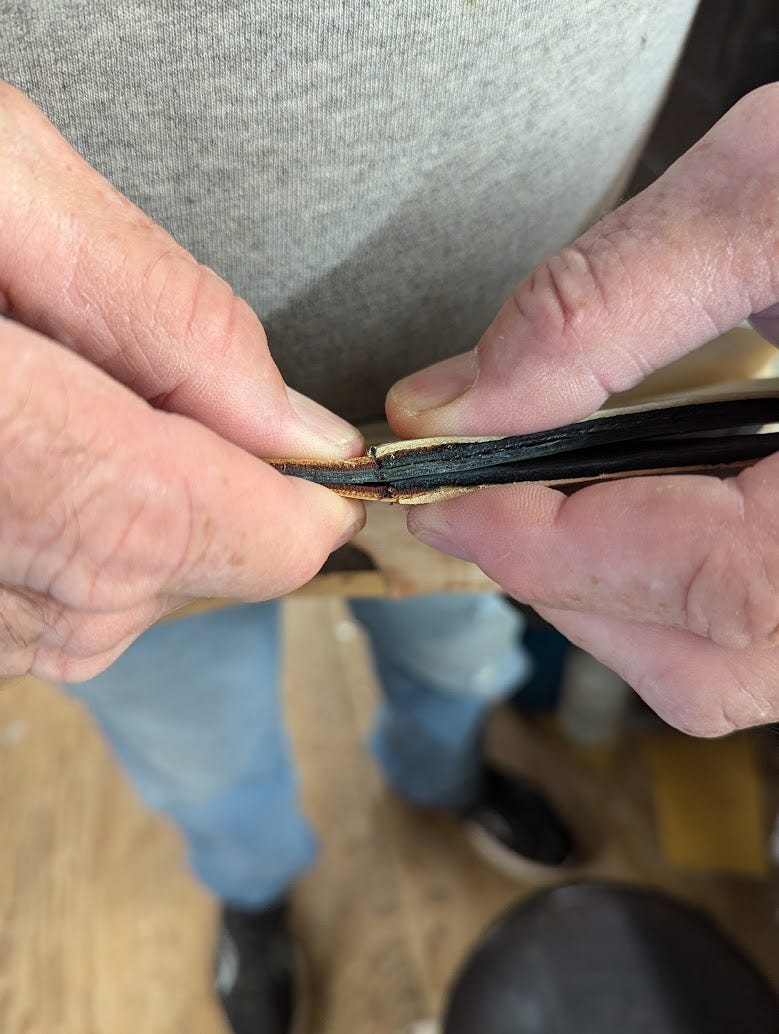
Pull the staples, then pull your thread through and tie it off, and trim the excess off. I came in from one side, at an angle, then did the same thing on the other side.
Finally, sand those edges down. This will be on the inside of the boot so if you don’t smooth everything out you’ll be feeling it as you wear them.
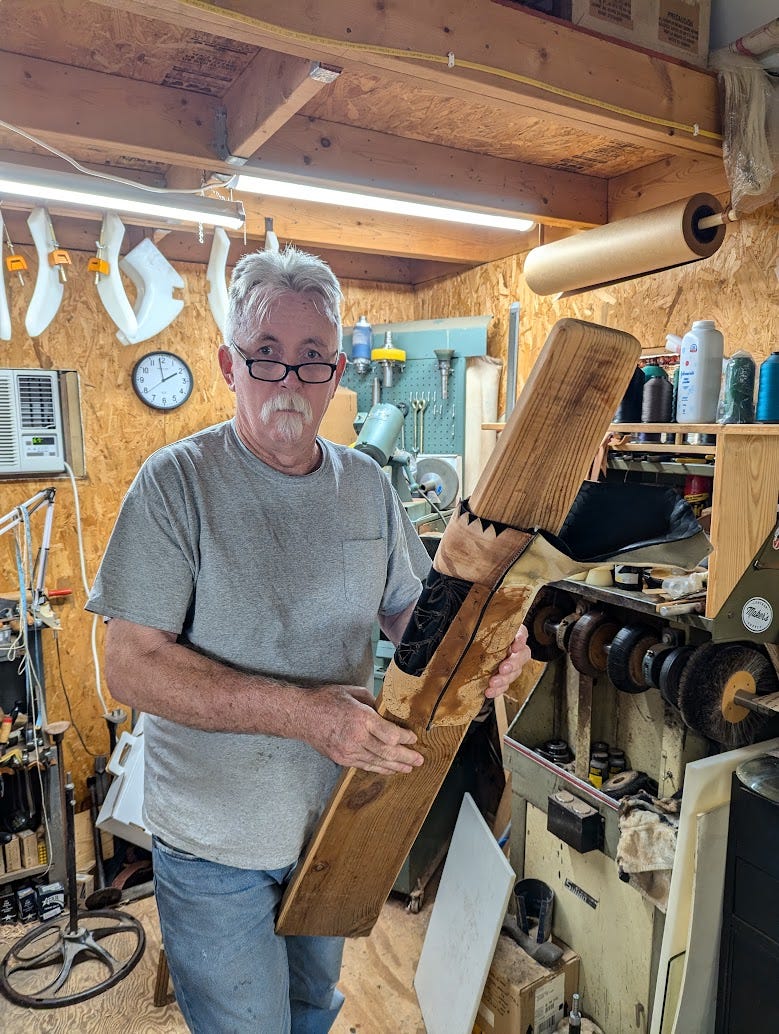
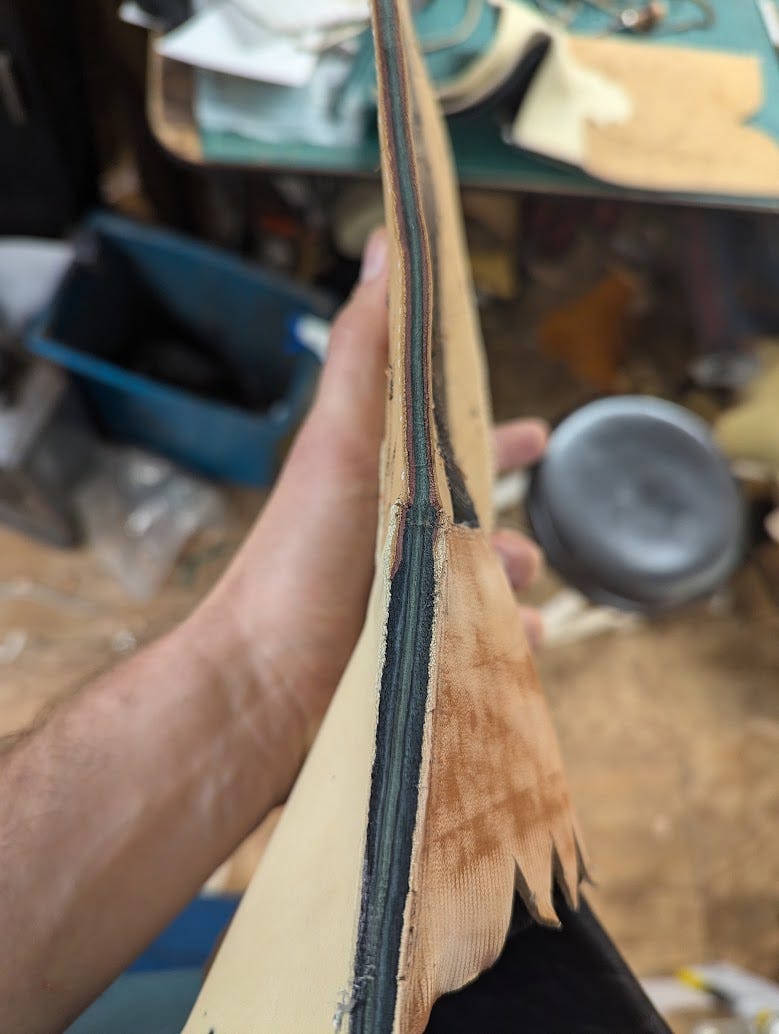
Here is Dan, stretching the uppers down on a board. The board is angled on one side, so you just pull the tops over until they flatten out.
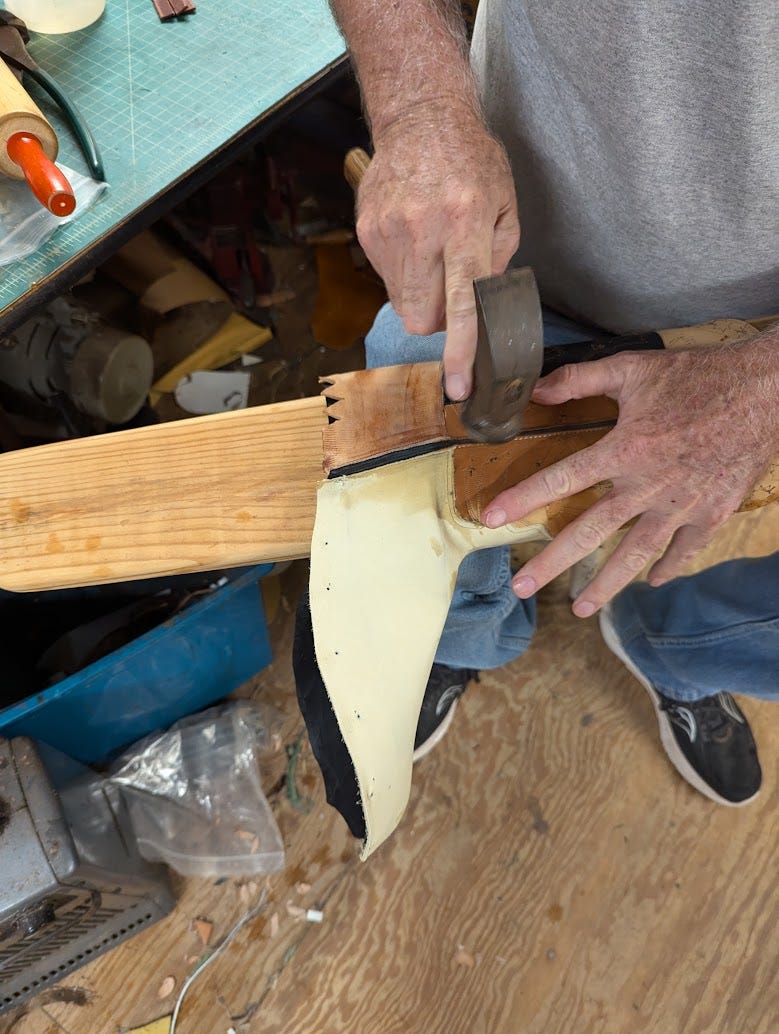
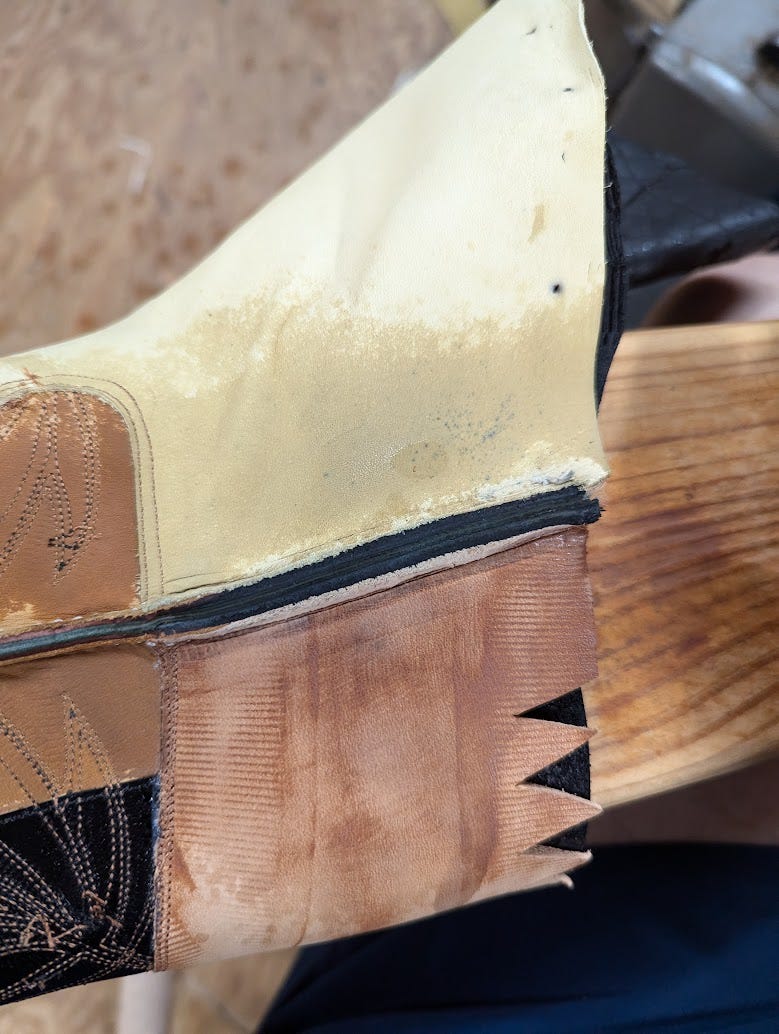
You want to beat the seam flat with a hammer at this stage. Make sure to spray the side seam down first, especially the hard counter so it is pliable. On the hard counter, pull the toe away from you and hammer downwards (if everything is placed like in this pic) so that the hard counter curls over on itself on the seam.
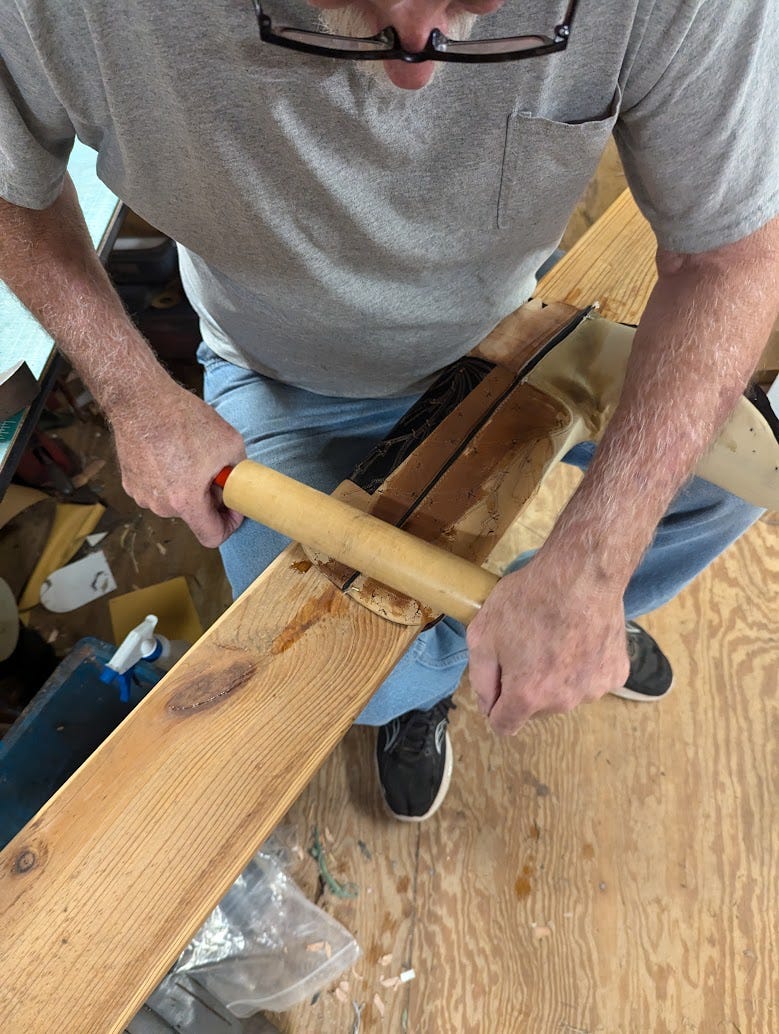
You can also use a rolling pin to smooth everything out more.
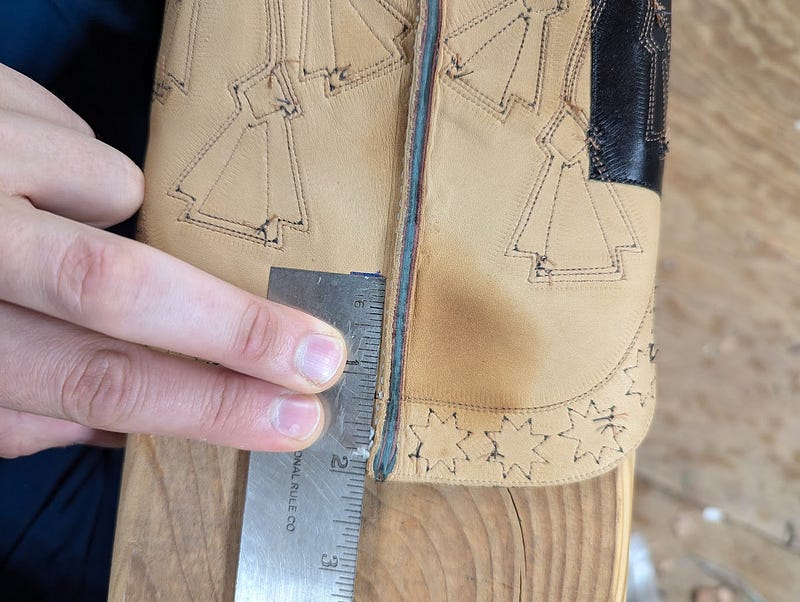
Mark out how your pull tabs will sit. Here I have 2 inches where where the base of the pull tab will be attached to, and 2 1/2 inches for the slices where you pull the other side through.
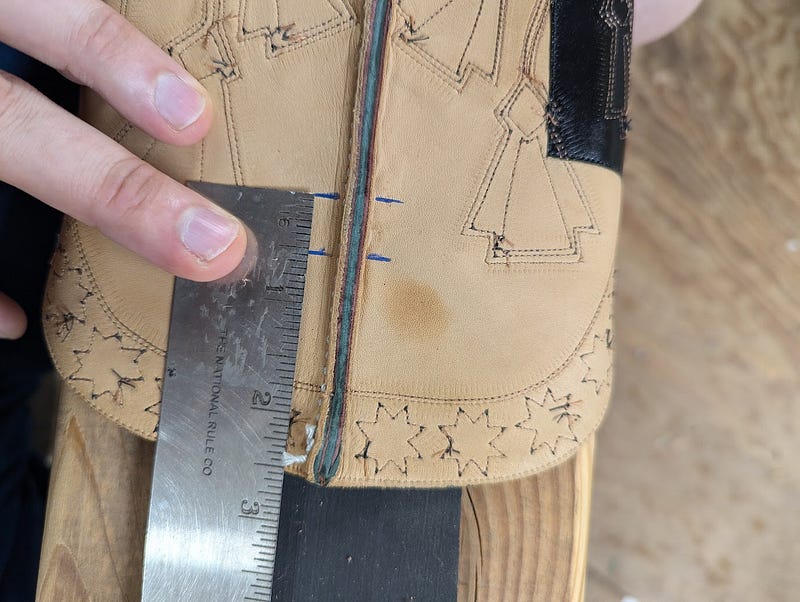
First bit glued down and the holes cut. Stitch it down afterwards. Dan always stitches it from the outside which requires folding over the tops to get in there. I think you can do either or, since that stitch will be covered up anyway.

Some narrow needle nose pliers to pull the two halves through the slices you cut earlier. You should do two vertical stitches on the outside of the tops, along the side seam, to secure those two hanging flaps, you can see it in the picture below.
Next, wet the boots down and turn them inside out (or I guess the outside in). Its a bit complicated and there is a lot of pulling involved, but its fairly self explanatory. Afterwards, pull them back over the board, hammer the side seam down a bit, and let them dry on the board.
Wow. All that and you’ve only made the uppers. I could probably have made several pairs of shoes in that time.
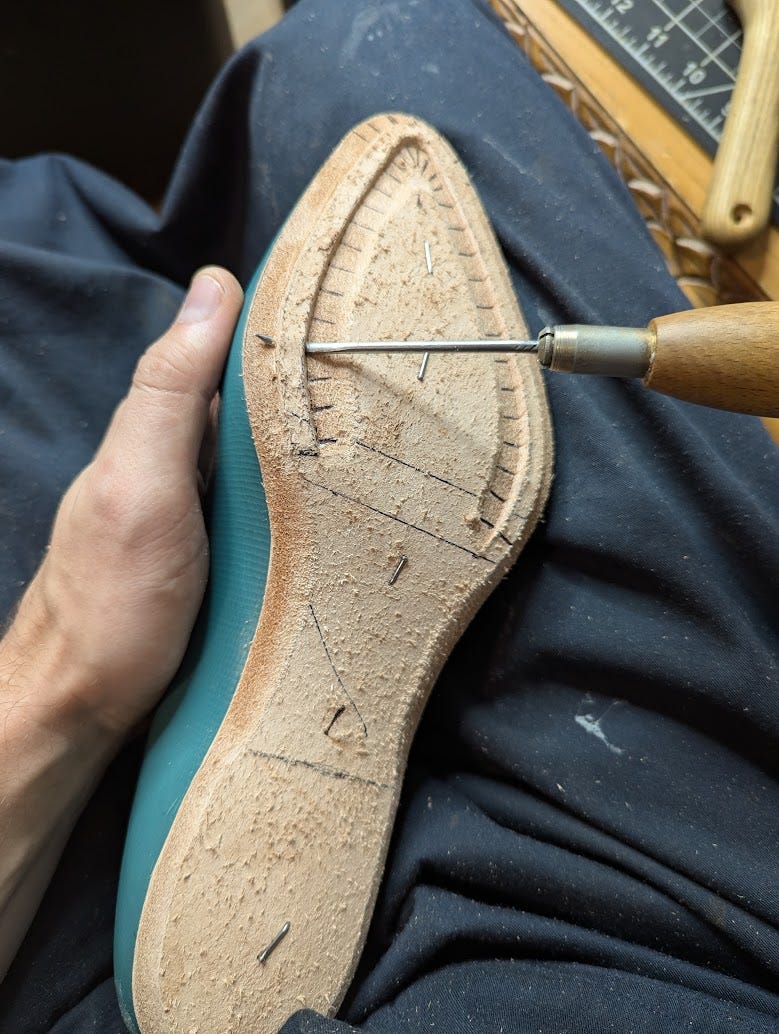
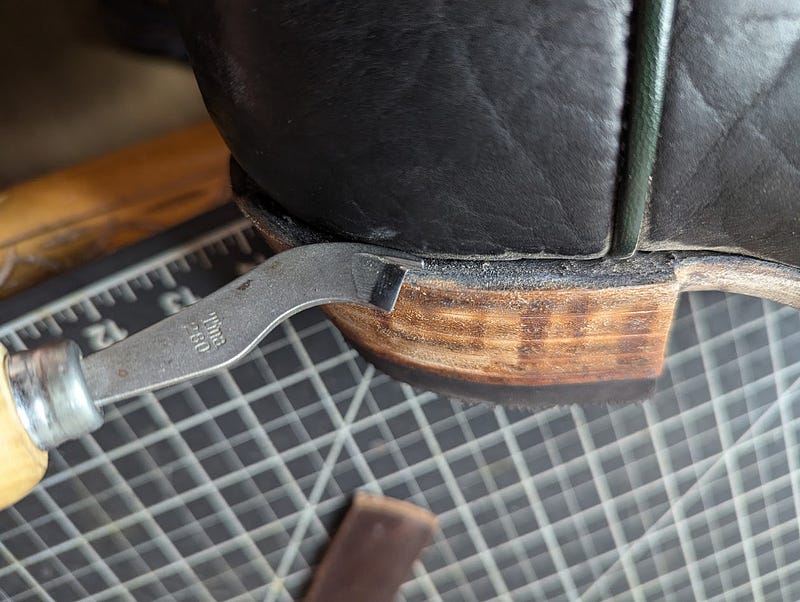
When you’re trimming the insole, do it similar to the beveled waist shoe. Find the widest point, draw a line across and terminate your holdfast along that line. Same idea, 7mm for the first cut of the holdfast, 6 mm for the second half. Cowboy boot makers do like 3 mm for the first cut, which makes it look like the welt is coming out from the side of the upper instead of from underneath it. It is a stylistic choice, but I much prefer the look with a holdfast farther in.
Make sure you trim down the waist very well and don’t leave any sharp corners. You’ll be doing a beveled waist so you want that nice curvature. Use a broken piece of glass to help shape it.
I didn’t take any pictures of the lasting process. You should be familiar with lasting a pair of shoes at this point, so I will cover the differences here.
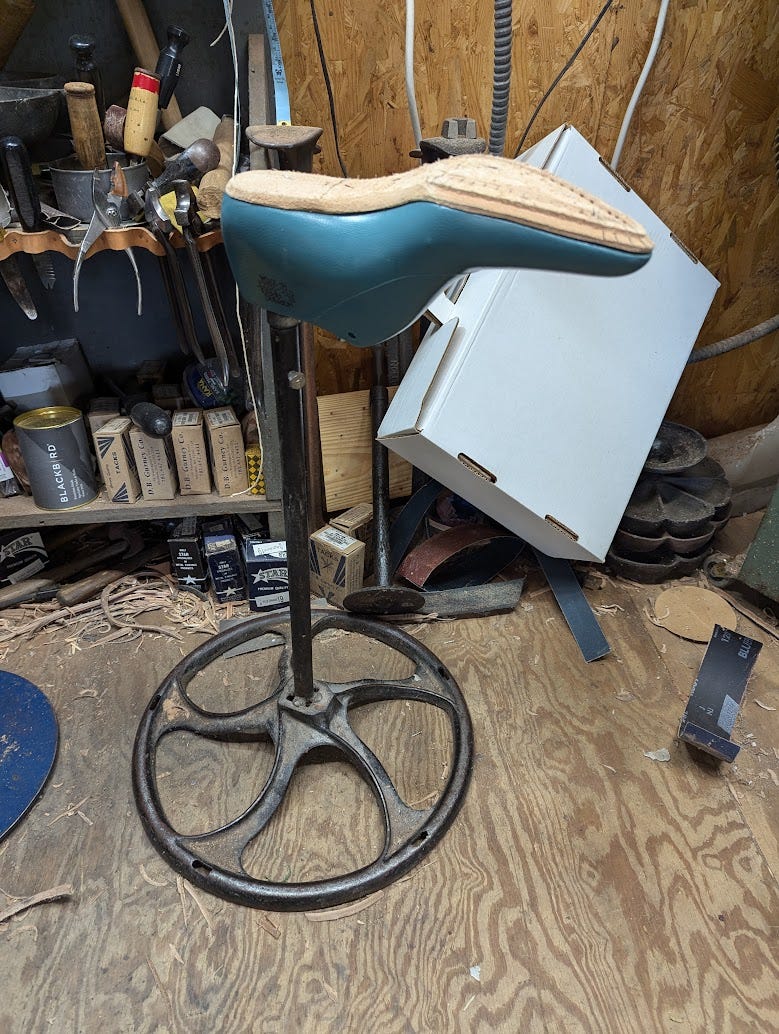
Boot makers typically use a lasting stand instead of doing it in their laps like shoemakers. It makes sense, with how long the tops are. They also typically wet last, which means you soak the uppers for 20–30 minutes prior to lasting. Two reasons for this, one, your hard counter needs to be wet to be pliable since you used a thick soling leather for it. Second, the pattern is basically flat so it is much harder to pull everything into shape. A shoe or derby boot pattern has contours already built into it from the pattern making process.
A note, lasting boots is much easier to do with tacks instead of the thin lasting nails that most shoemakers use. You are doing much harder pulls while holding everything in place and the tack can be set with one hand since they have super sharp points then just hammered in immediately.
First, put the uppers down along the lasting stand and fold the counter in half, lining up the two side seams. That helps you center it on the last.
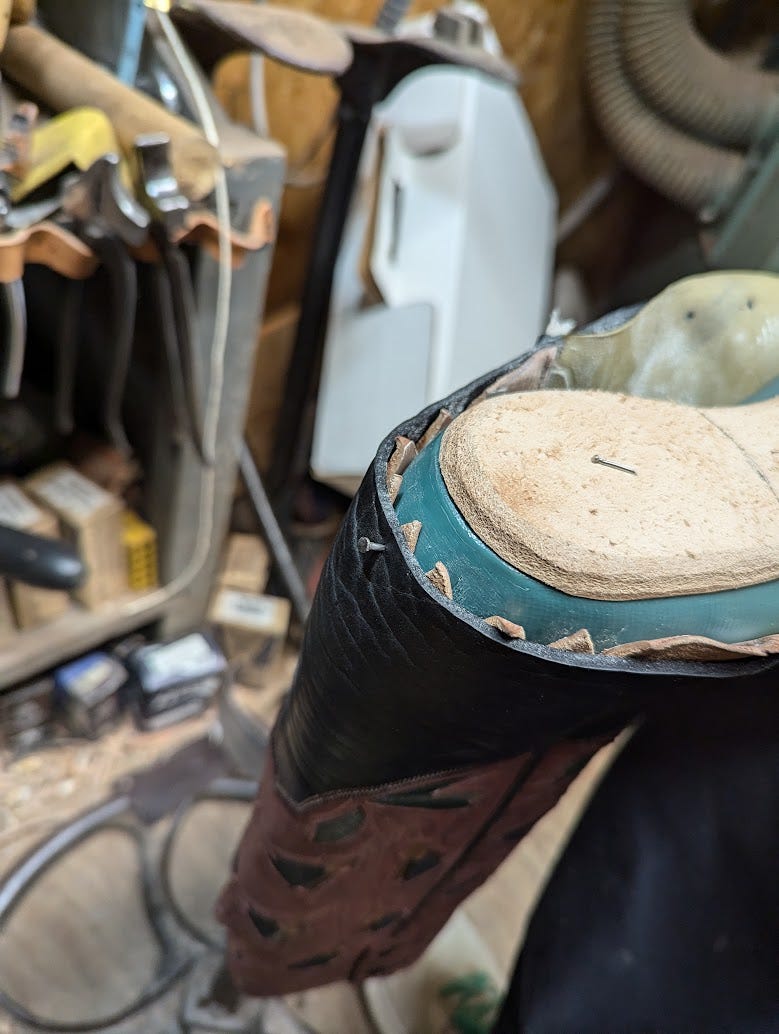
Put the last onto the lasting stand afterwards and tack the heel in about 1/4 inch above the insole, centered. Next, pull hard on your toe and tack it in, then do two more pulls to the left and right of your center toe tack. Pull everything off the lasting stand and double check to make sure the tops are still centered, look inside and make sure your side seams are even with each other as well. Now, remove that tack in the heel and pull the heel down around the insole and tack it into place. It should be down just enough for the saw tooth part of your heel counter to be down around the heel. As long as you’re consistent with both pairs you should be fine, but to be sure when you’re doing the second boot at this stage place both boots side by side and check to make sure the height of the little point on your heel is the same for both boots.
Follow that same process, doing a pull and tacking it in on both sides, then taking it off and checking to make sure it is centered, all the way down to the waist. When you do your pulls, do it in the directions shown below. If you don’t, you will get a lot more material bunching up in the waist area.
Once the front part of the shoe is lasted, it is time to pull the side seams. Take the boot off the stand and check alignment of the last inside the boot first. Sometimes it is canted a bit to one side. If that is the case, you will pull the side seam opposite of the cant first. When you’re pulling the side seams, use one hand to pull down on the tops and use the pliers to pull inwards and towards the heel. This puts a lateral force on the heel counter and helps create the cup for the heel. Holding the tops down while doing that pull helps prevent the boots from shifting out of alignment.
Notice in the above picture how my side seams don’t line up perfectly. Two things, sometimes it just happens how you pull it, sometimes it is because your boots are not aligned perfectly straight on the last. After I finished this pair completely I noticed that it was slightly off. It is only really noticeable if you compare the side seams side by side so not a huge deal, but still better to catch it earlier.
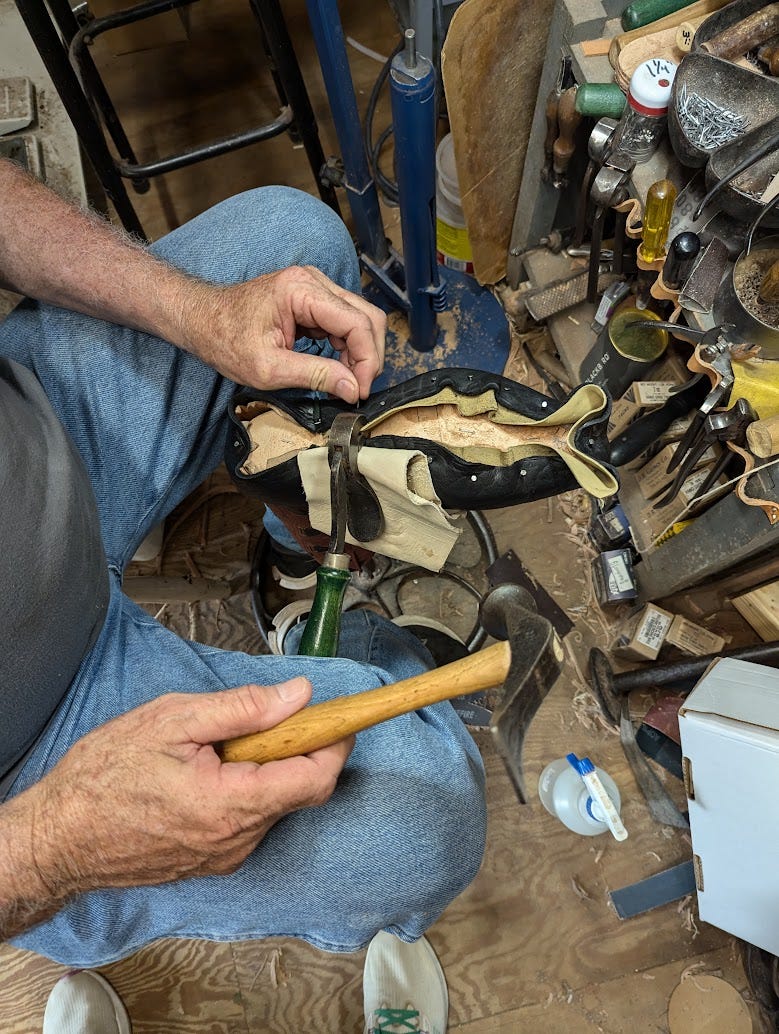
Once the side seams are pulled, you can finally do the waist. If you happen to have a pair of bulldog pliers, now is an excellent time to use them. You need a lot of force here and there isn't much space in the waist to get leverage on normal lasting pliers. Use a folded piece of leather to keep the pliers from marking your uppers. Here you can see Dan with one leg over the handle of the pliers keeping everything down so he can tack everything in place.
Finally, tack the heel in. There shouldn’t be much pulling involved here, Dan has a trick where he pulls a stretchy material around the heel and hammers everything down into place. Afterwards just come in with some tacks to secure everything.
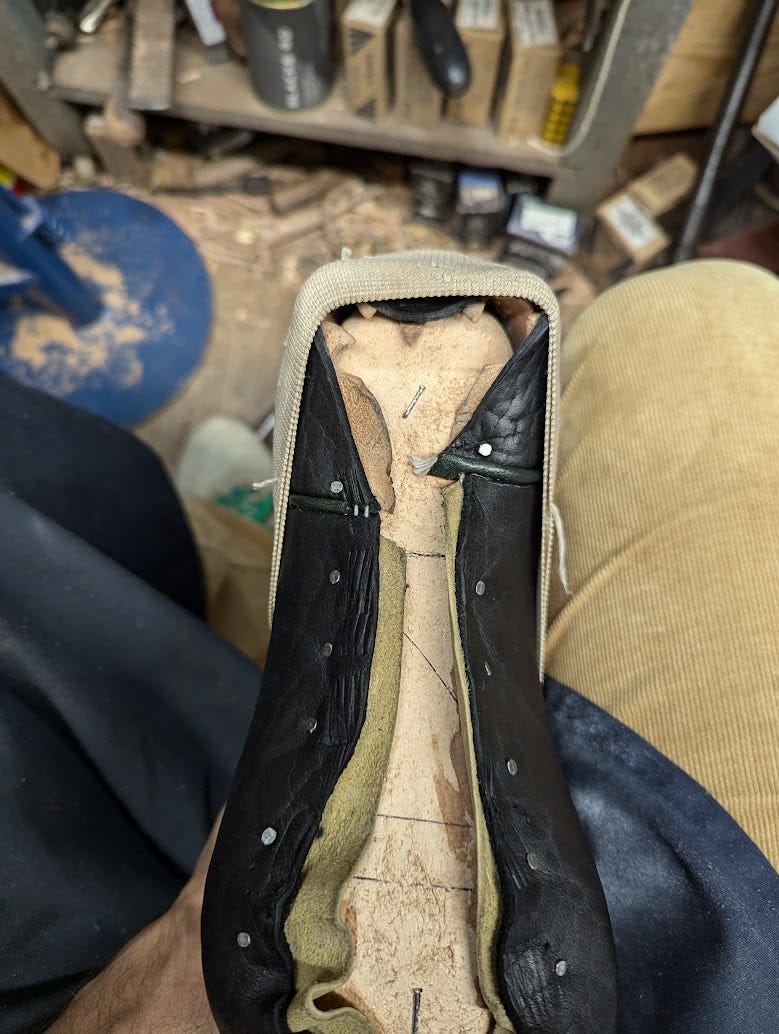
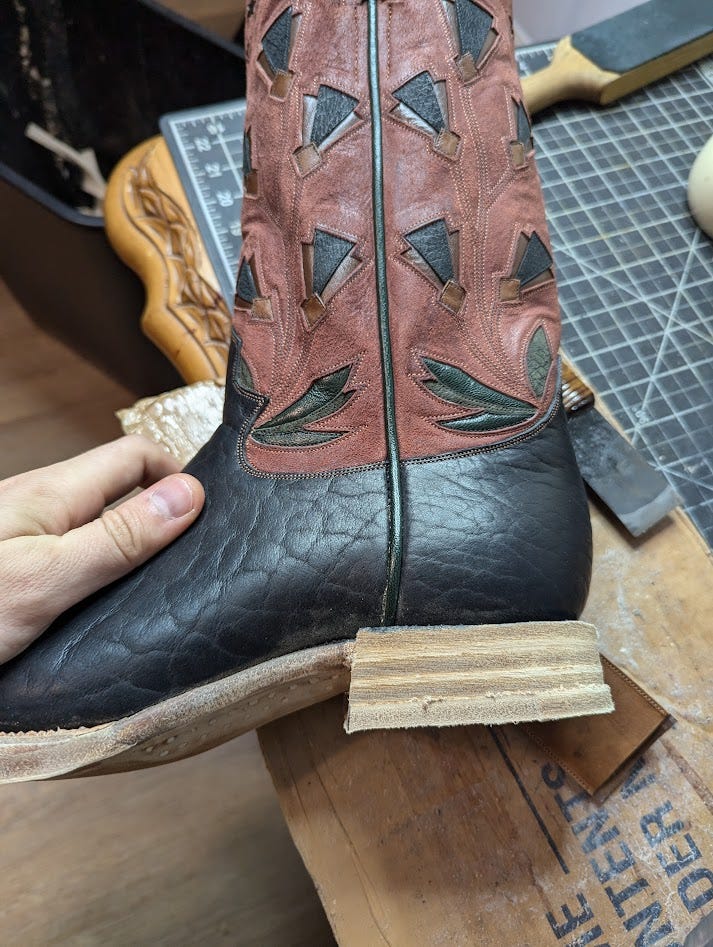
A lasted boot. Double check the height of your heel counter to make sure it is matching in both pairs. On a well lasted boot when it is sitting at its correct heel height, the front side of the top (as shown in this picture) should be a 90 degree angle. Mine isn’t at this angle of photo, but will be whenever I stretch out the tops into proper position at the end.
From here, you’re basically following the same process for a shoe. I will detail some key differences instead of talking through everything again.

After welting, you can tack in your heel (if you have a metal heel plate on your last). For the waist, you can either peg it, or sew it. I just wet my insole along the waist and made some holes with my welting awl, then just threaded my welting thread through. The shank just goes over that, followed by a shank cover.
You attach your sole using the same process as detailed in my other blog posts. Since you’re going to have a fiddleback waist here, you can shave down part of the sole in the waist area on the flesh side to give it a slimmer look. Instead of stitching to a really thin welt like we did with a shoe, you would just peg the waist. Also notice the notches I left for the heel. You can just have a smooth flow in that transition, or if you want to attempt a notched heel you can cut it like this.
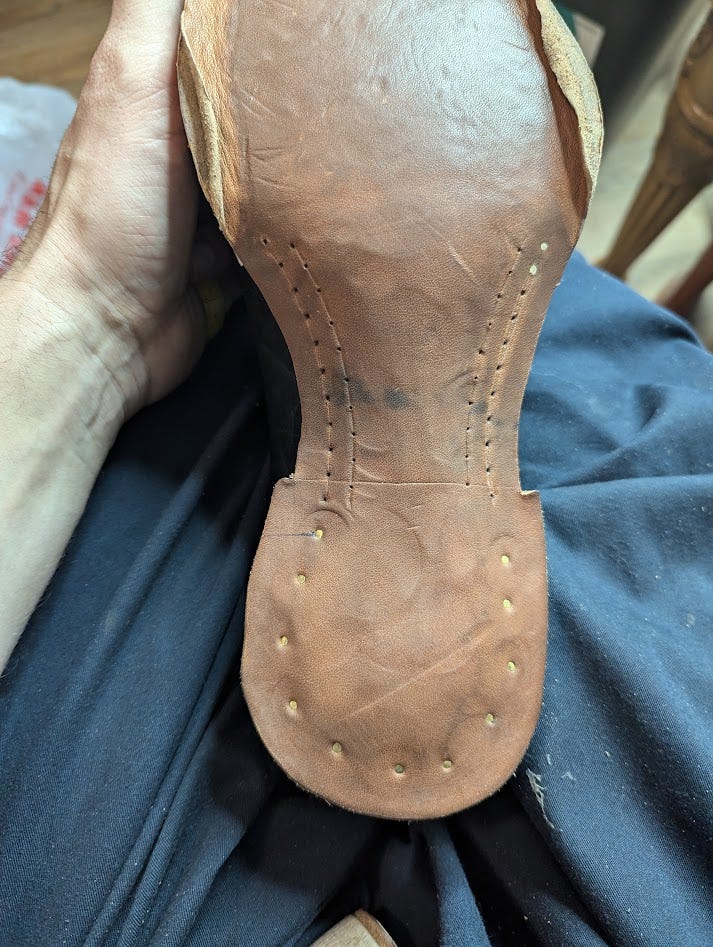
I drew this arch line by eyeballing where the pegs should hit the insole (right along the shank cover). You need a pegging awl and some wood pegs for this, of course, and you should do it while the leather is still quite damp. I marked out the holes 7 mm apart, make sure you’re generous with the beeswax on your awl when you punch the holes. I do the pegs one at a time, create the hole, then hammer in the peg. If you pre-punch all the holes, it shifts the leather a bit and makes the holes a little smaller and harder to get the pegs in. If a peg breaks off on you, you can just hammer the awl in at the same spot and put another peg in. The second row of pegs should be staggered like the picture above.
A few things to note on the waist. Make sure you trim everything down to where you want it right after pegging, while the sole is still damp. You can use a piece of glass to further shape it, then use a waist iron to give it that nice round edge. Also, once the leather is sufficiently dry trim down your pegs and sand everything smooth. Make sure you do all this before starting on the heels, it will be much harder to do afterwards!
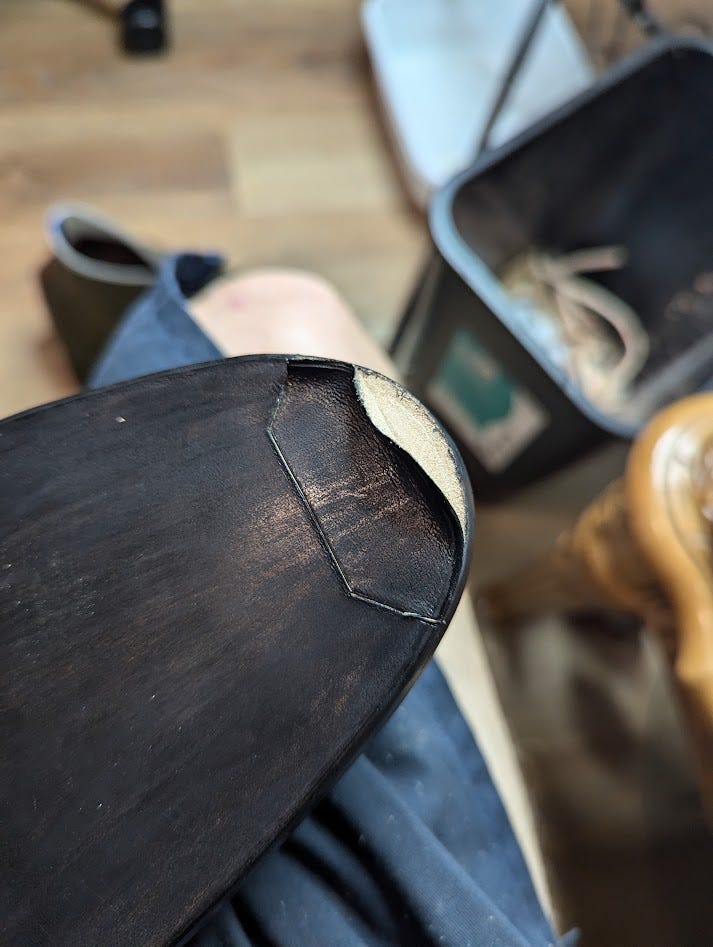
I created a notched heel here. There isn’t a whole lot to it besides some knife skill. On the sole, while it is still damp, create your initial notch. Then, at every stack up you can extend that line, making sure you trim everything at the stack. It is much easier to do it one by one than to try to cut a notch like that at the end.
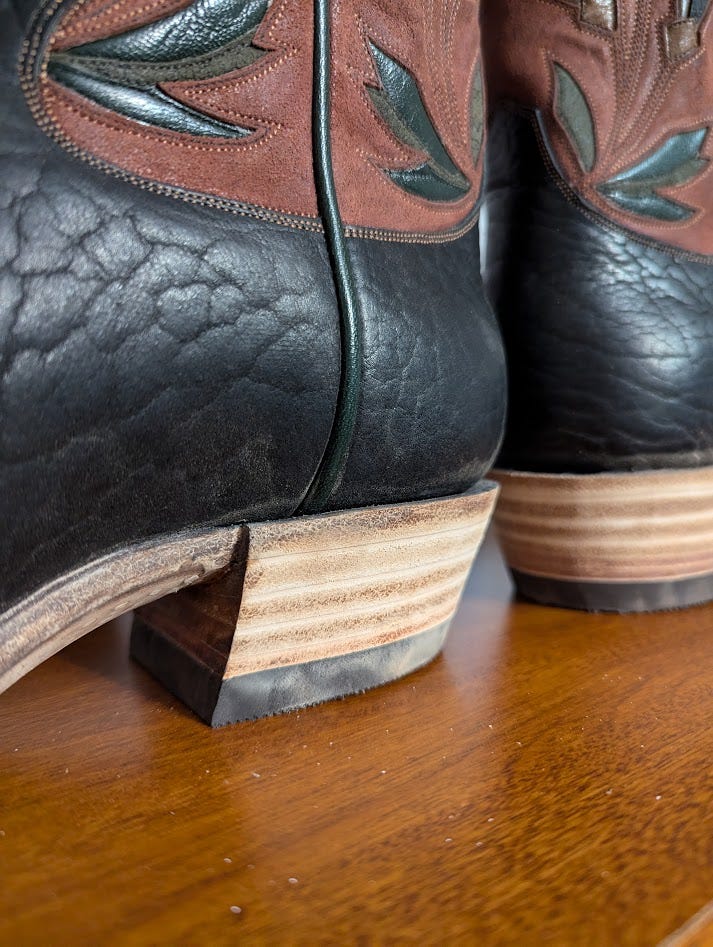
A picture of the notched heel before finishing.
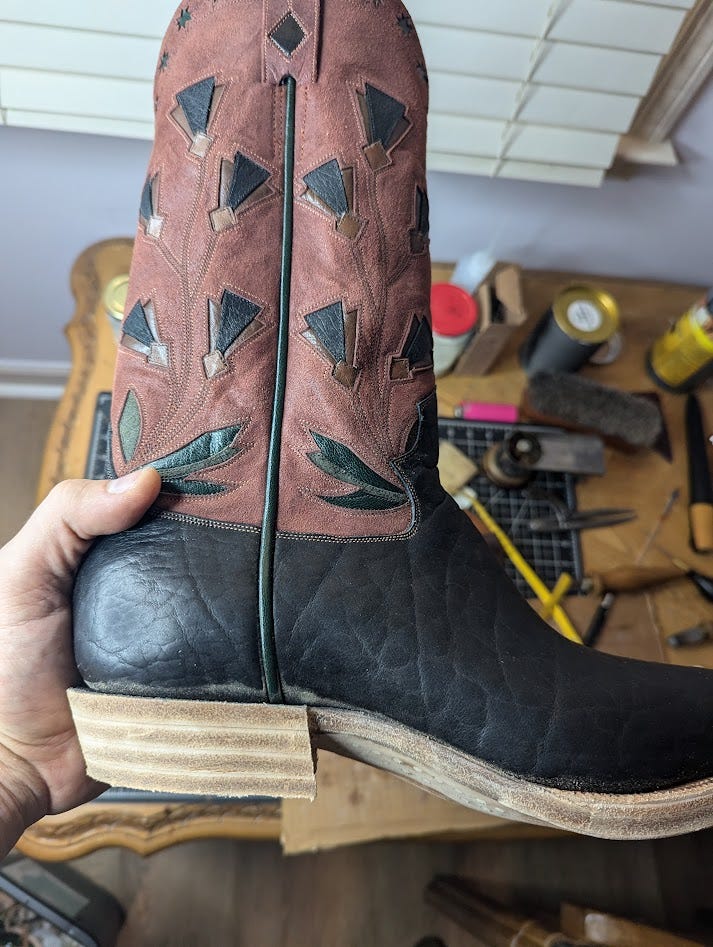
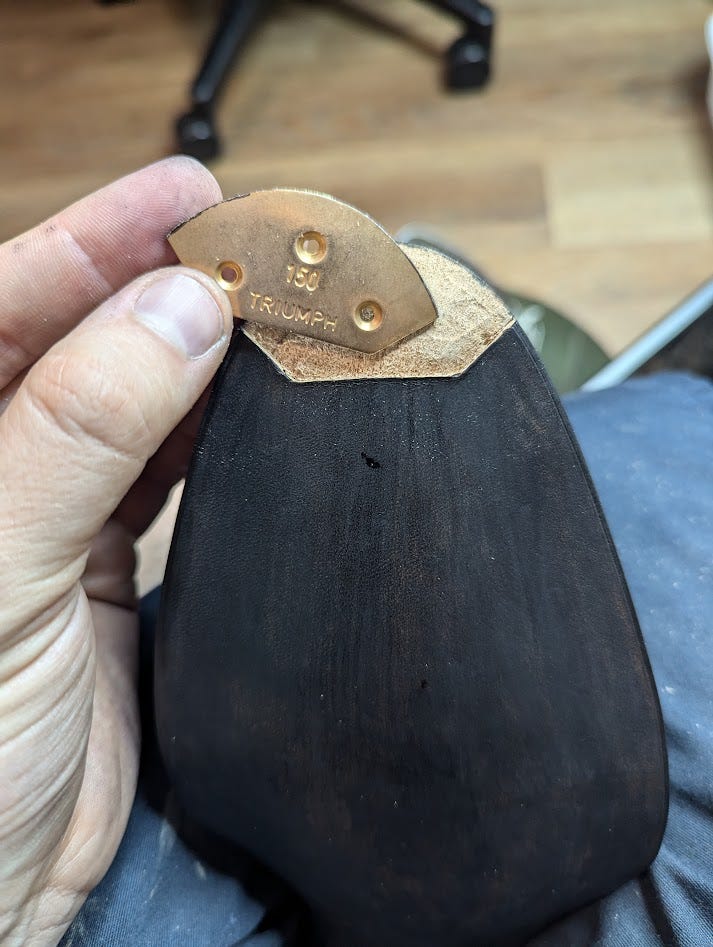
There is also a trick to creating the slanted heel. Basically, build your heel the same as a normal shoe, stacking each layer and planing it to get rid of the curvature from the last and shank cover. Once you get everything leveled, take your top lift and trace along the bottom of your heel with it. The cowboy boot top lifts will be considerably smaller than your heel will be at this stage. You can use that line as a guide when you’re taking it in on a finisher (or painstakingly trimming and sanding by hand!). Not much to it on the finisher, just hold it consistently at an angle while trying to keep everything even. Once you sand it in to that line, drive some long nails through your heels then glue your top lifts on and finish everything up.
I didn’t use a rand here, so the flesh side of the sole is the top of my boot sole around the heel. It warped quite a bit when I was creating the heel, so you can take a welt knife and trim everything level and flat, and get rid of the fuzzies.
Make sure you’re using irons on your edges, and heel, when you’re doing your finishing. It was a little bit tricky to get in everywhere with the angled heel I had, but I used the back of my waist iron to get in there. Before the iron, while you’re sanding the leather gets fuzzy, afterwards everything hardens up and you can get a nice smooth edge.
The finishing process is the same as a shoe. Sand, dye, burnish, wax. Whatever process you use should work the same.
I added a recessed toe tap to my pair. Line it up, make some slices around the shape of it, then come in with the knife from the edge, peeling it back as you keep slicing it out. Then attach the taps with screws, and take it to the sander to make the metal even with the edge of the shoe. It is better to do this after you’ve set your edges because it is much harder to come in with a setting iron after you attach the toe taps.
I didn’t take any good pics, but I made the soles super glossy. To achieve that look, you’ll need to use a piece of glass to take the top layer off after the sole is dried, sometime during your finishing process and sand everything down. This will allow the leather to absorb the dye evenly and smooth everything out. Dye it next, and after it is dry burnish the hell out of it with a wooden burnishing rod. You can do that another few times, lightly sand, dye, burnish. Then at the end use the same wax you use on your edges to give it a nice polish. I use Fiebings Wax Burnishing Ink. You can even use your mirror shine wax on the bottom and edges afterwards to really make it pop.
The last step is shaping your tops using a Mallory Stretcher. Your tops will get wrinkled and distorted during the turning and lasting process, spray them down slightly and get everything taut with the stretcher and let it sit over night. You can do double check your short heel measurement here to make sure that it didn't get any smaller when you side seamed, and stretch it back to the right size. I am re-waxing the tops in this pic, the leather is a kangaroo waxed flesh, but the wax wore off during turning and lasting.
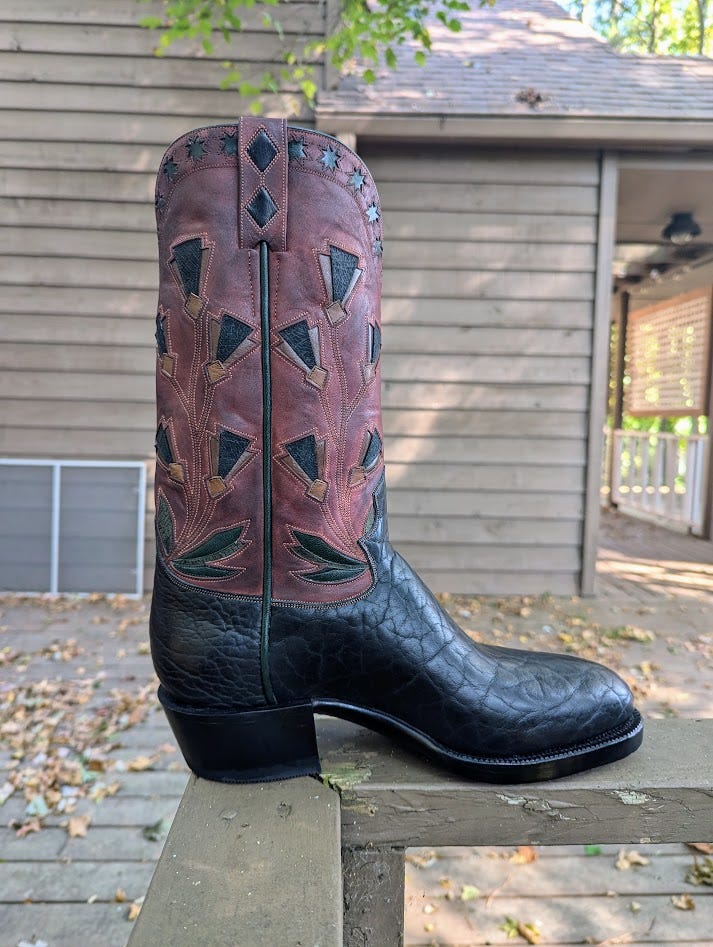
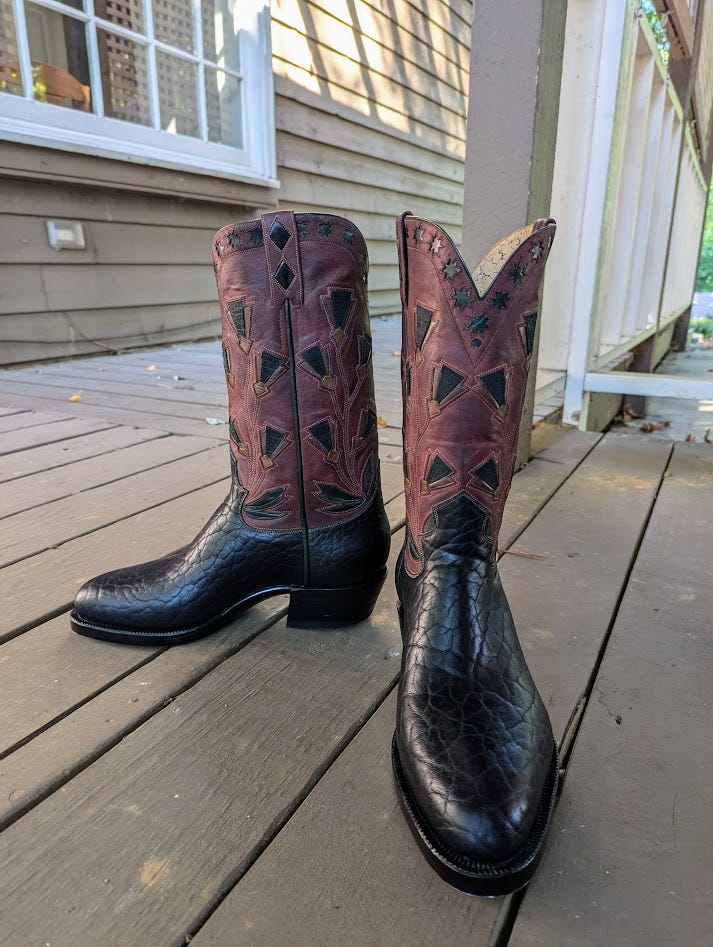
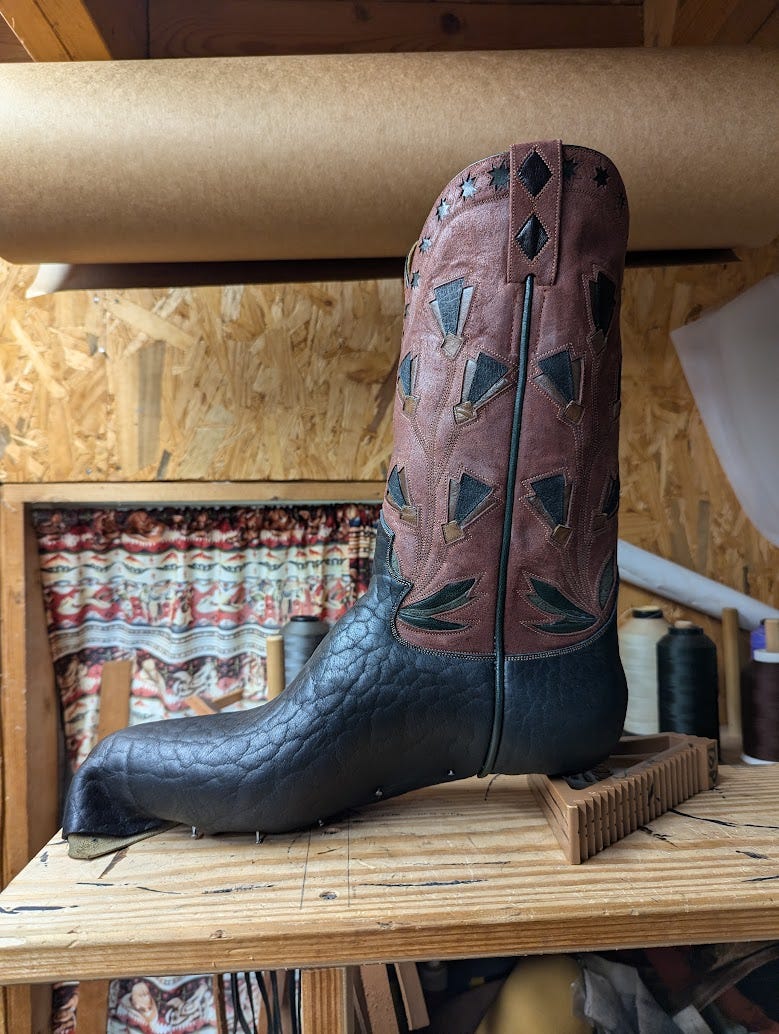
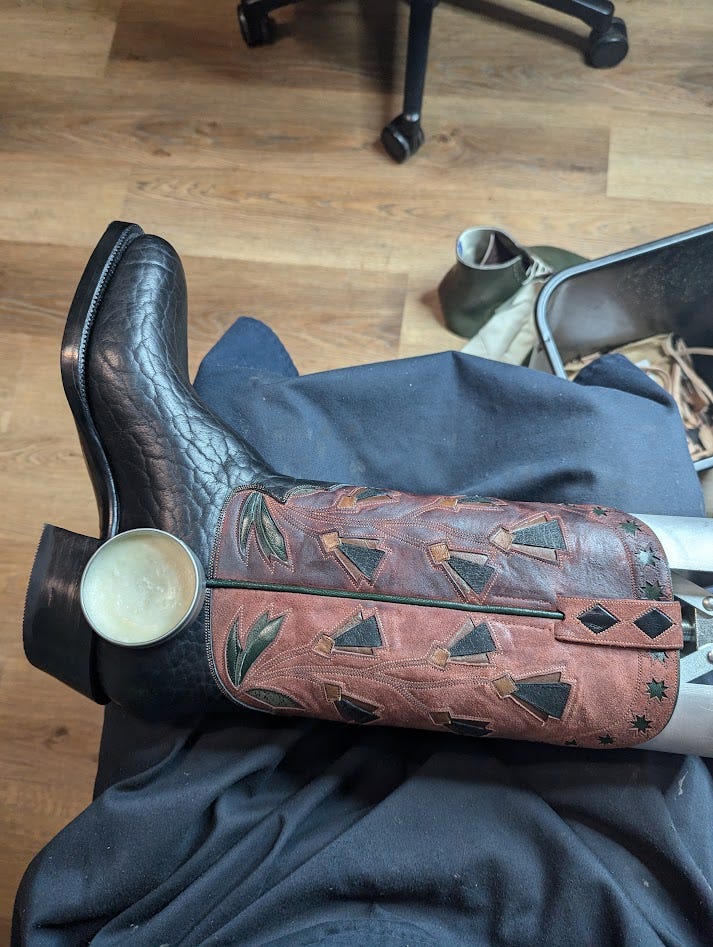
Done! Some wax really transforms the look!
To see other articles and my body of work, check out arnoshoes.com
To keep up with my current projects, give my Instagram page a follow
3 comments
Fantastic article, many, many thanks for sharing this information.
I love it, make a beautiful boots and shoes is a pure art and satisfaction.
Thanks for this! It was very helpful